


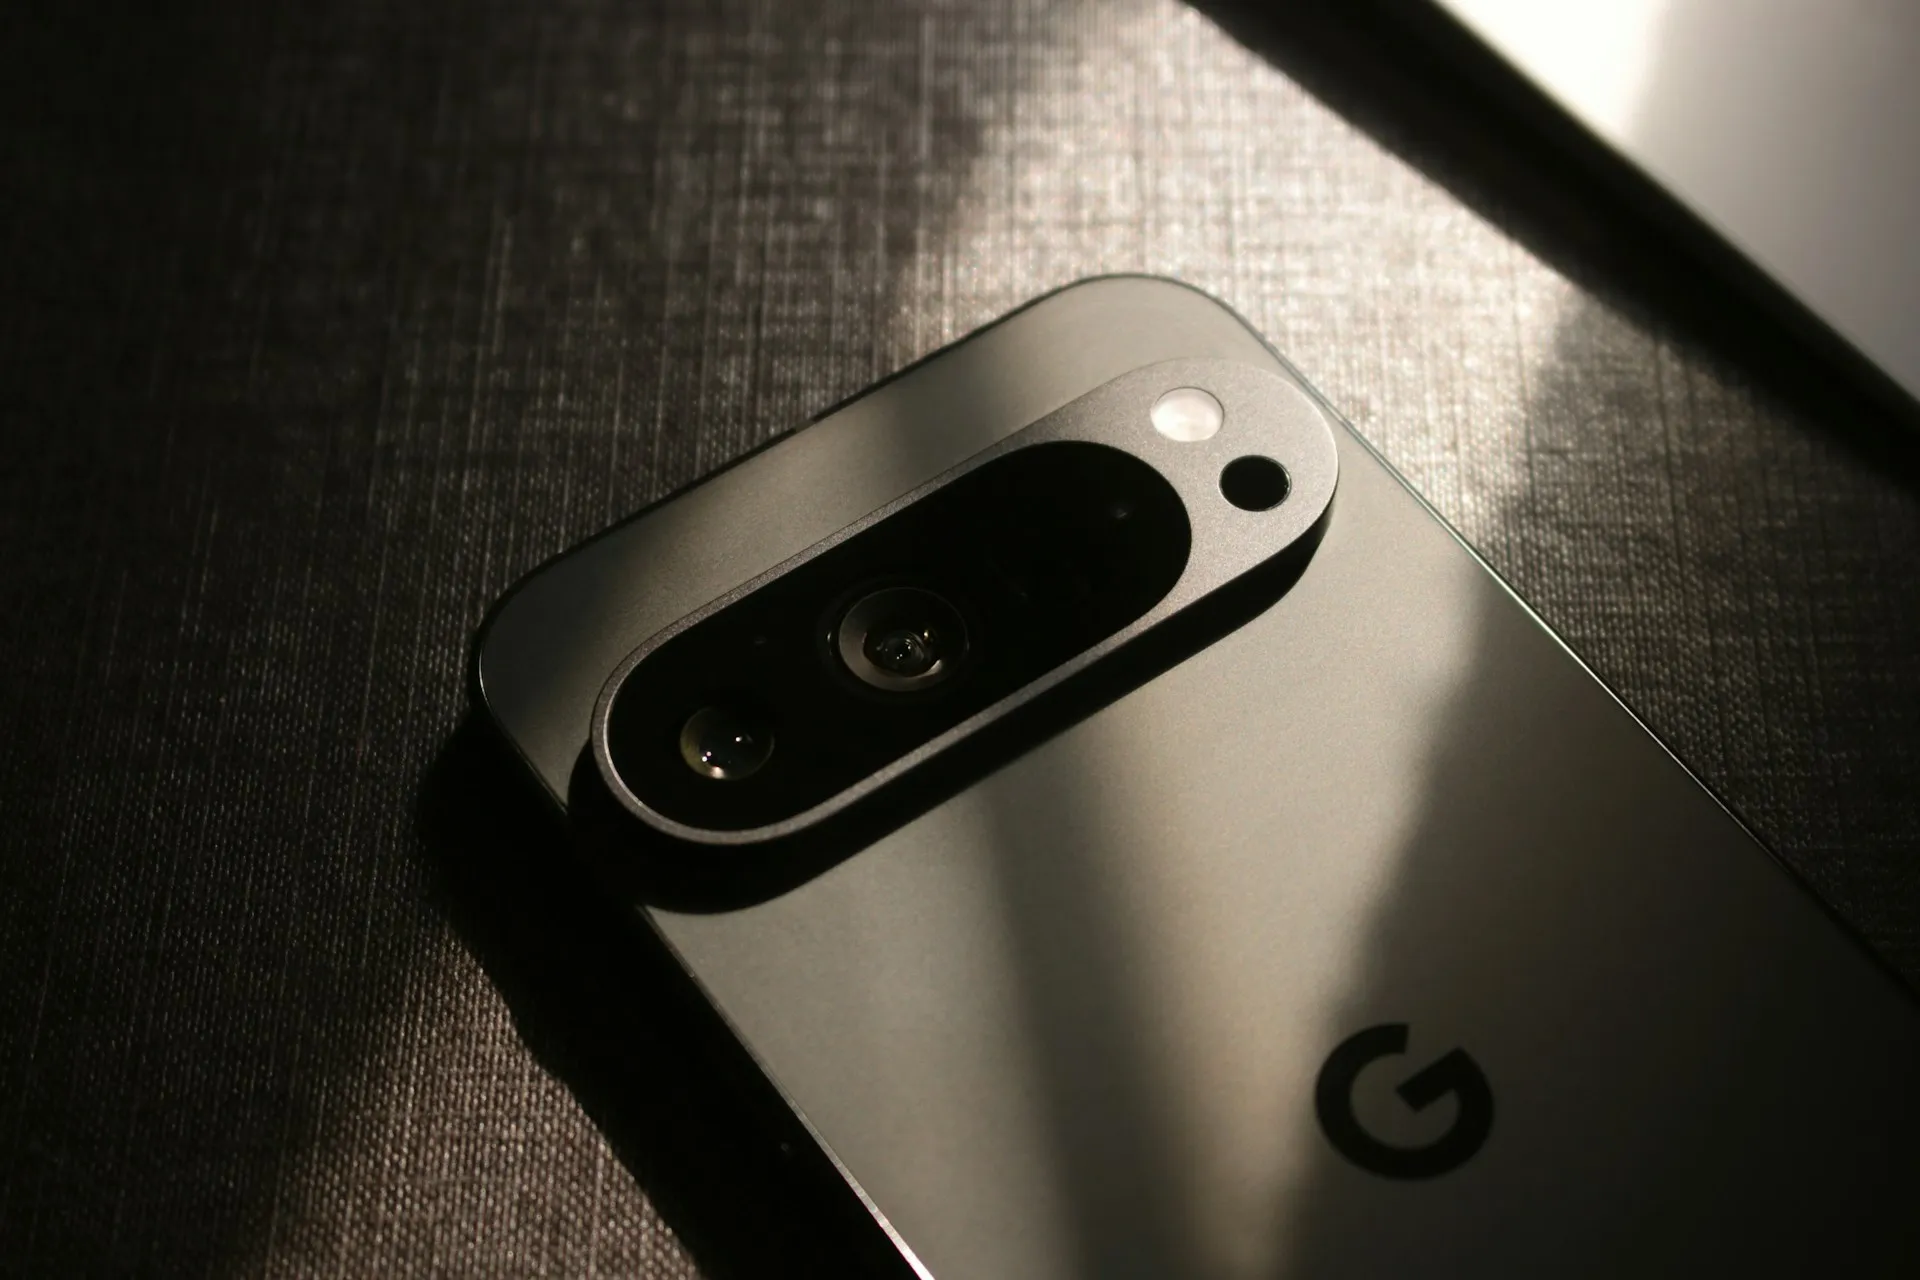
The Pixel 3a came out of nowhere and flexed its muscles to show the industry that you can have a great phone without a hefty price tag. Since Pixel smartphones are first-party devices straight from Google, you can be sure you'll have root access one way or another. For right now the method used to get your Pixel 3a rooted will take a few steps, but they go by real quick.
- See Also: How to Root Android 11 on Your Pixel 3a
Rooting your phone with Magisk opens up the world of mods like never before with a variety of benefits. One of the best things to come from Magisk is the ability to keep Google's SafetyNet flag from being tripped, which could stop you from using certain apps. With the platform continually evolving and getting better all the time, now's the perfect time to get started.
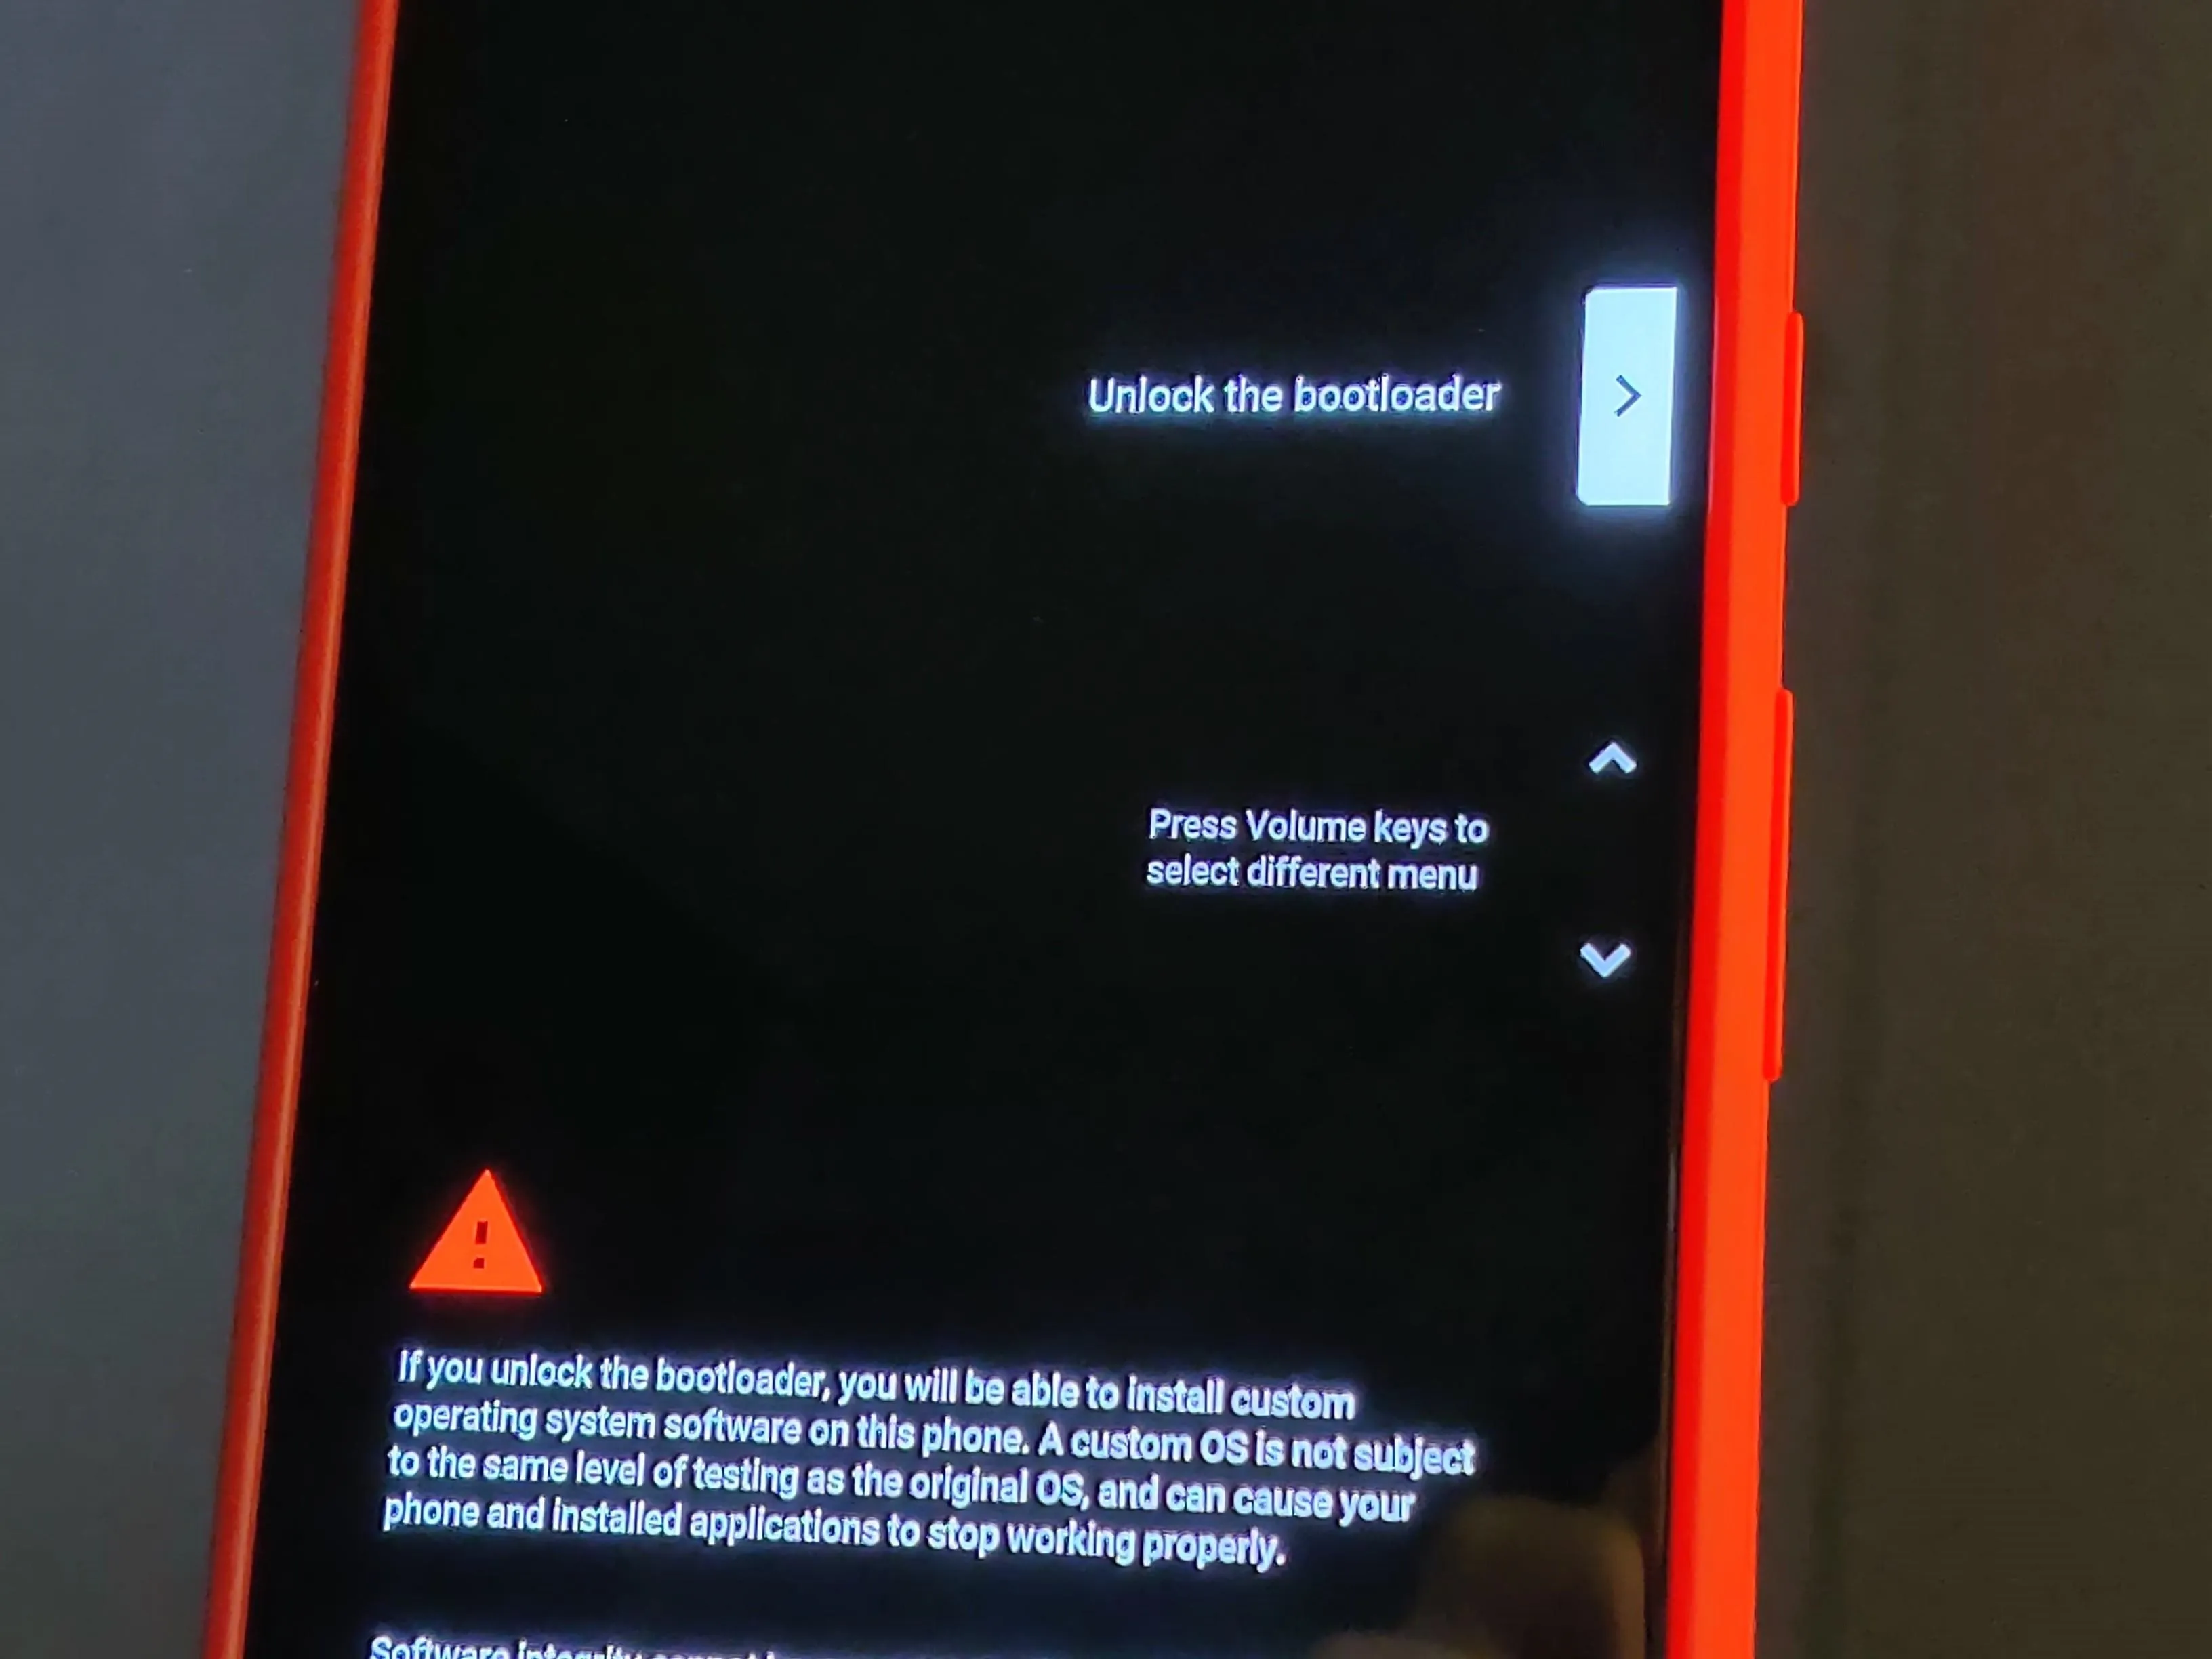
Unlock Your Bootloader
Of course, before you can get started with modding your Pixel 3a or rooting with Magisk, you'll need to unlock your bootloader. If you haven't done so yet, visit the guide below and get your bootloader taken care of before moving on with this guide.
There are two methods for rooting your Pixel 3a, and you can pick whichever one works better for you. The easiest and most beneficial of the two is done through the custom recovery environment via TWRP, which is the one most people will use for ease of access. The manual method is for when a device doesn't have TWRP support or for someone who prefers the old fashioned install process.
Root Using TWRP
Using TWRP is the method that works best since it was created to make our lives easier in the first place by reducing the overall steps required for gaining root access. If you'd rather not waste any extra time with unnecessary manual steps, using a custom recovery to gain full root access is the way for you without a doubt. It doesn't get any easier than this!
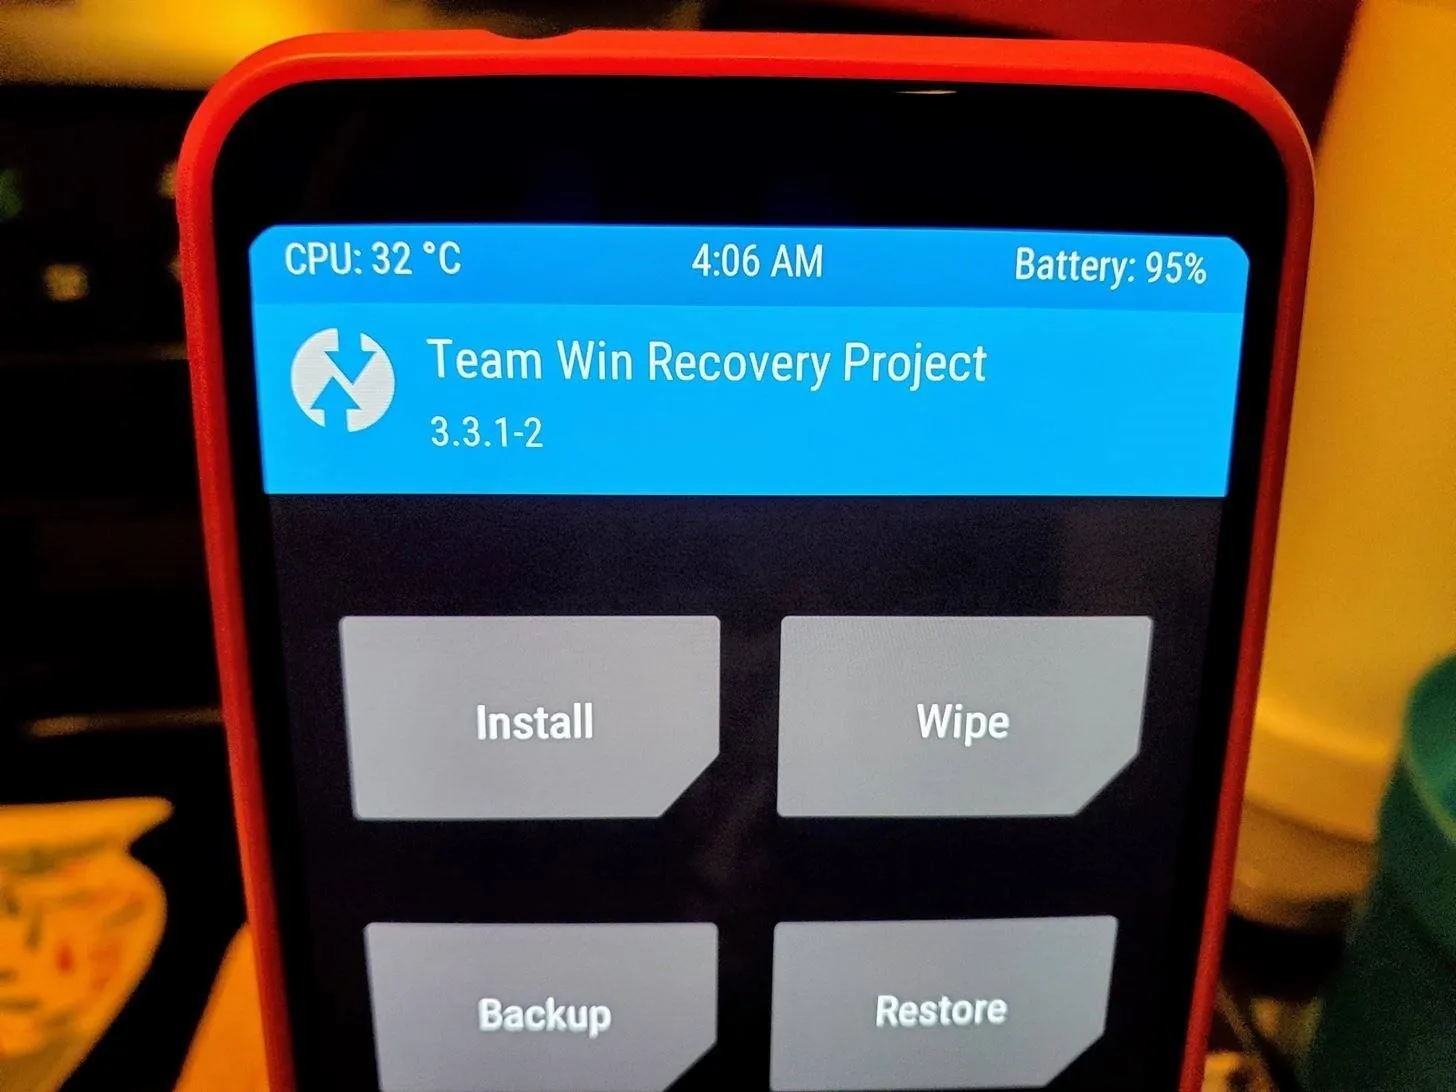
Install TWRP
Once your bootloader is unlocked, you need to grab the image file required to boot your Pixel 3a into TWRP. As mentioned previously, the benefits of installing Magisk on your system via TWRP provides the quickest route for gaining full root access. Having a custom recovery also means you can then install any ZIP file you want without having to rely on a computer when installed permanently.
- Don't Miss: How to Install TWRP Recovery on Your Pixel 3a
Download Magisk
The next thing you need to do is install the Magisk framework and the Magisk Manager app onto your system via a single ZIP file. This file will be installed within TWRP, and will patch your system to grant you full root access while passing Google's SafetyNet checks. Download the file below and place it in the "Download" folder on your phone's storage.
Boot into TWRP
Now you need to boot your phone into Fastboot Mode so that you can access the TWRP recovery menu. There are other ways of booting into TWRP, but the universal method will always be to boot into your device's native Fastboot Mode via the power down method. If you're unfamiliar with the process or need a refresher, you can hit the link below and complete the step real quick before moving on.
Once you're in Fastboot Mode, navigate the menu with the up and down volume keys to make your selection. After you highlight "Recovery Mode" tap the power button to confirm the action. The device will immediately boot right into the TWRP main menu if all went well.
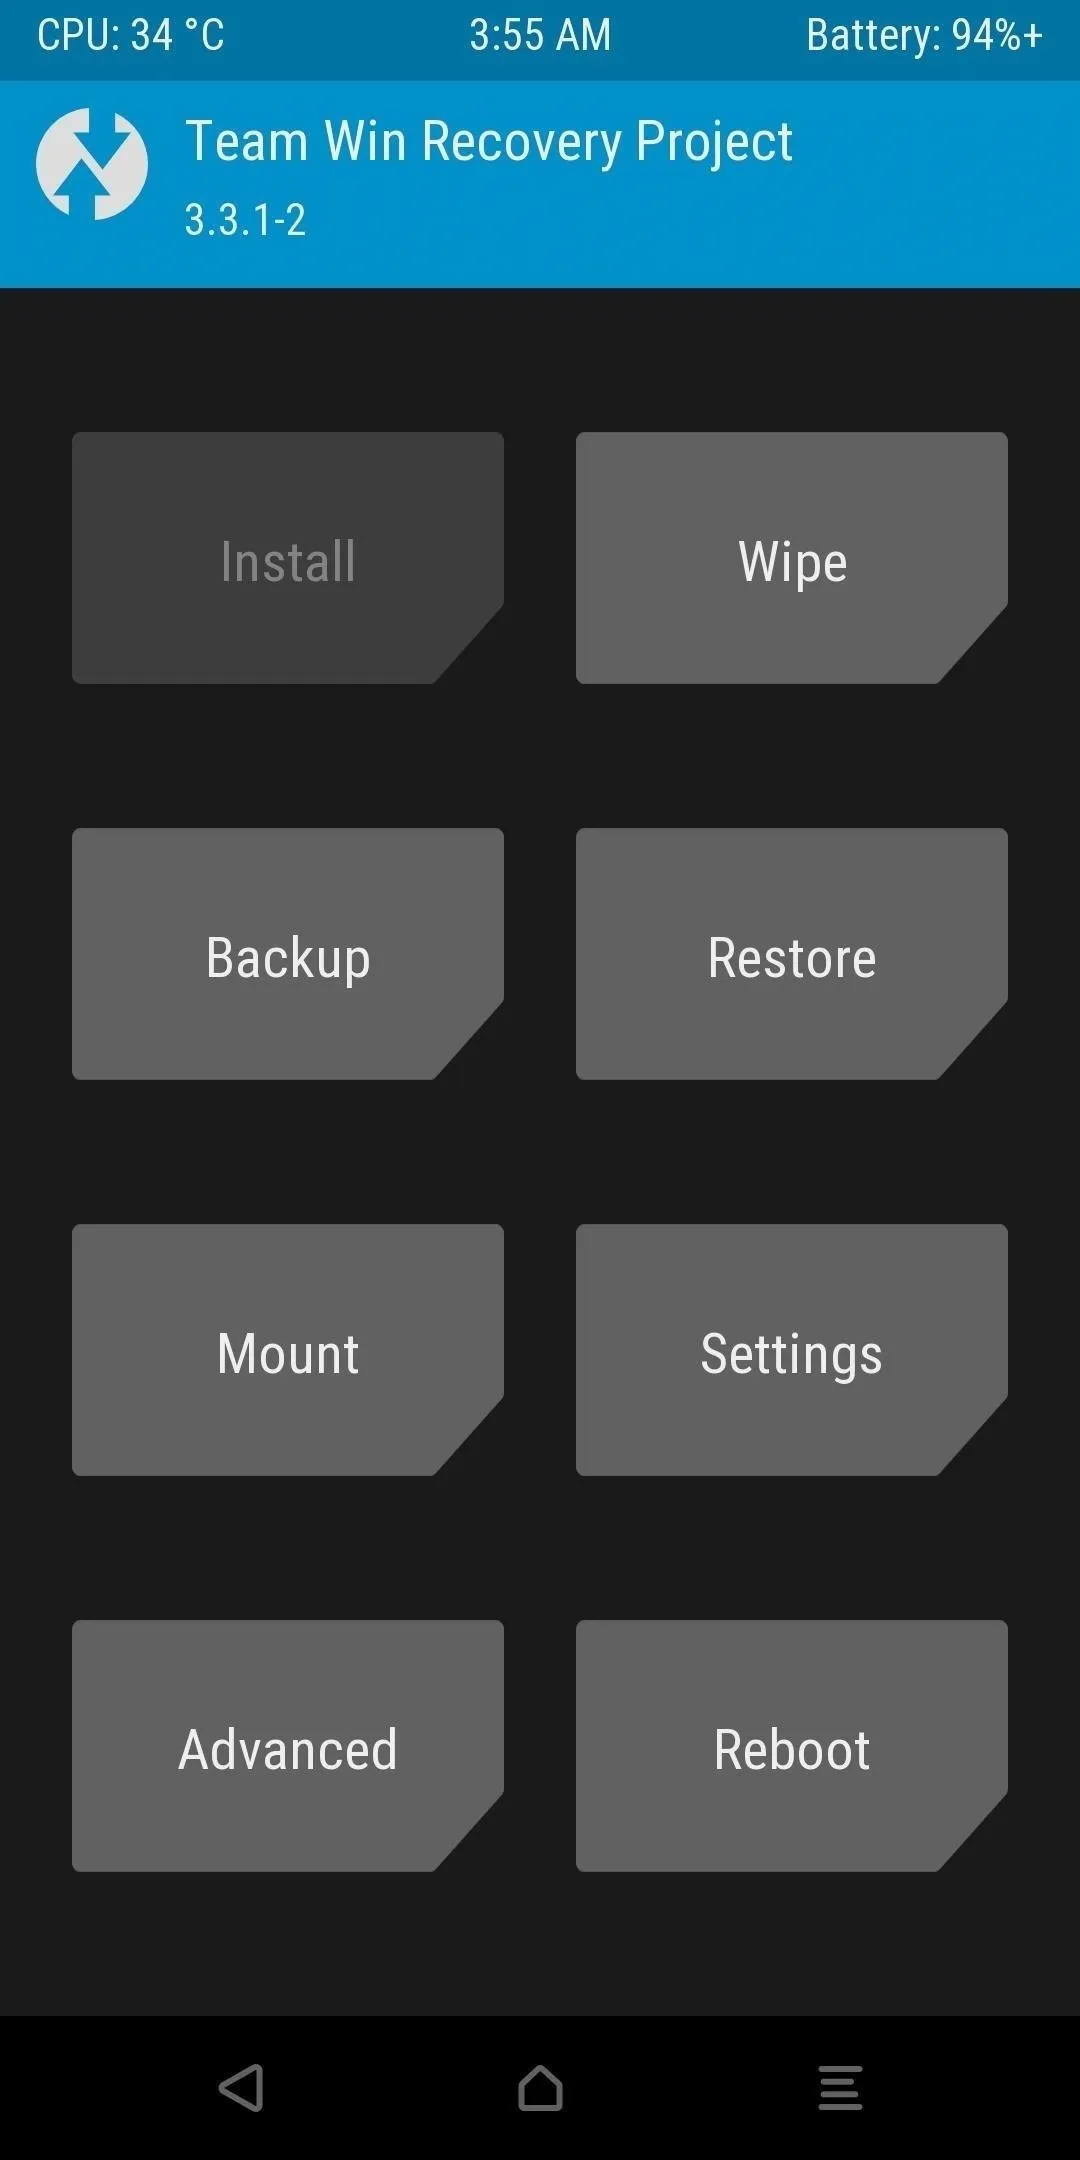
Flash Magisk
At this point, you should be sitting at the main screen of TWRP and ready to install Magisk onto your phone. From the main menu, tap "Install" then navigate to the "Download" folder where you stored the Magisk ZIP file. Once you have located the Magisk file, tap it once, then initiate the "Swipe to confirm Flash" slider to begin installing it.
The Magisk framework will automatically start doing its thing and will patch the boot image on your system partition. This means your phone will have full root access and still pass Google's SafetyNet, as mentioned previously. Once Magisk is finished installing on your system, tap the "Reboot System" option to boot back into Android.

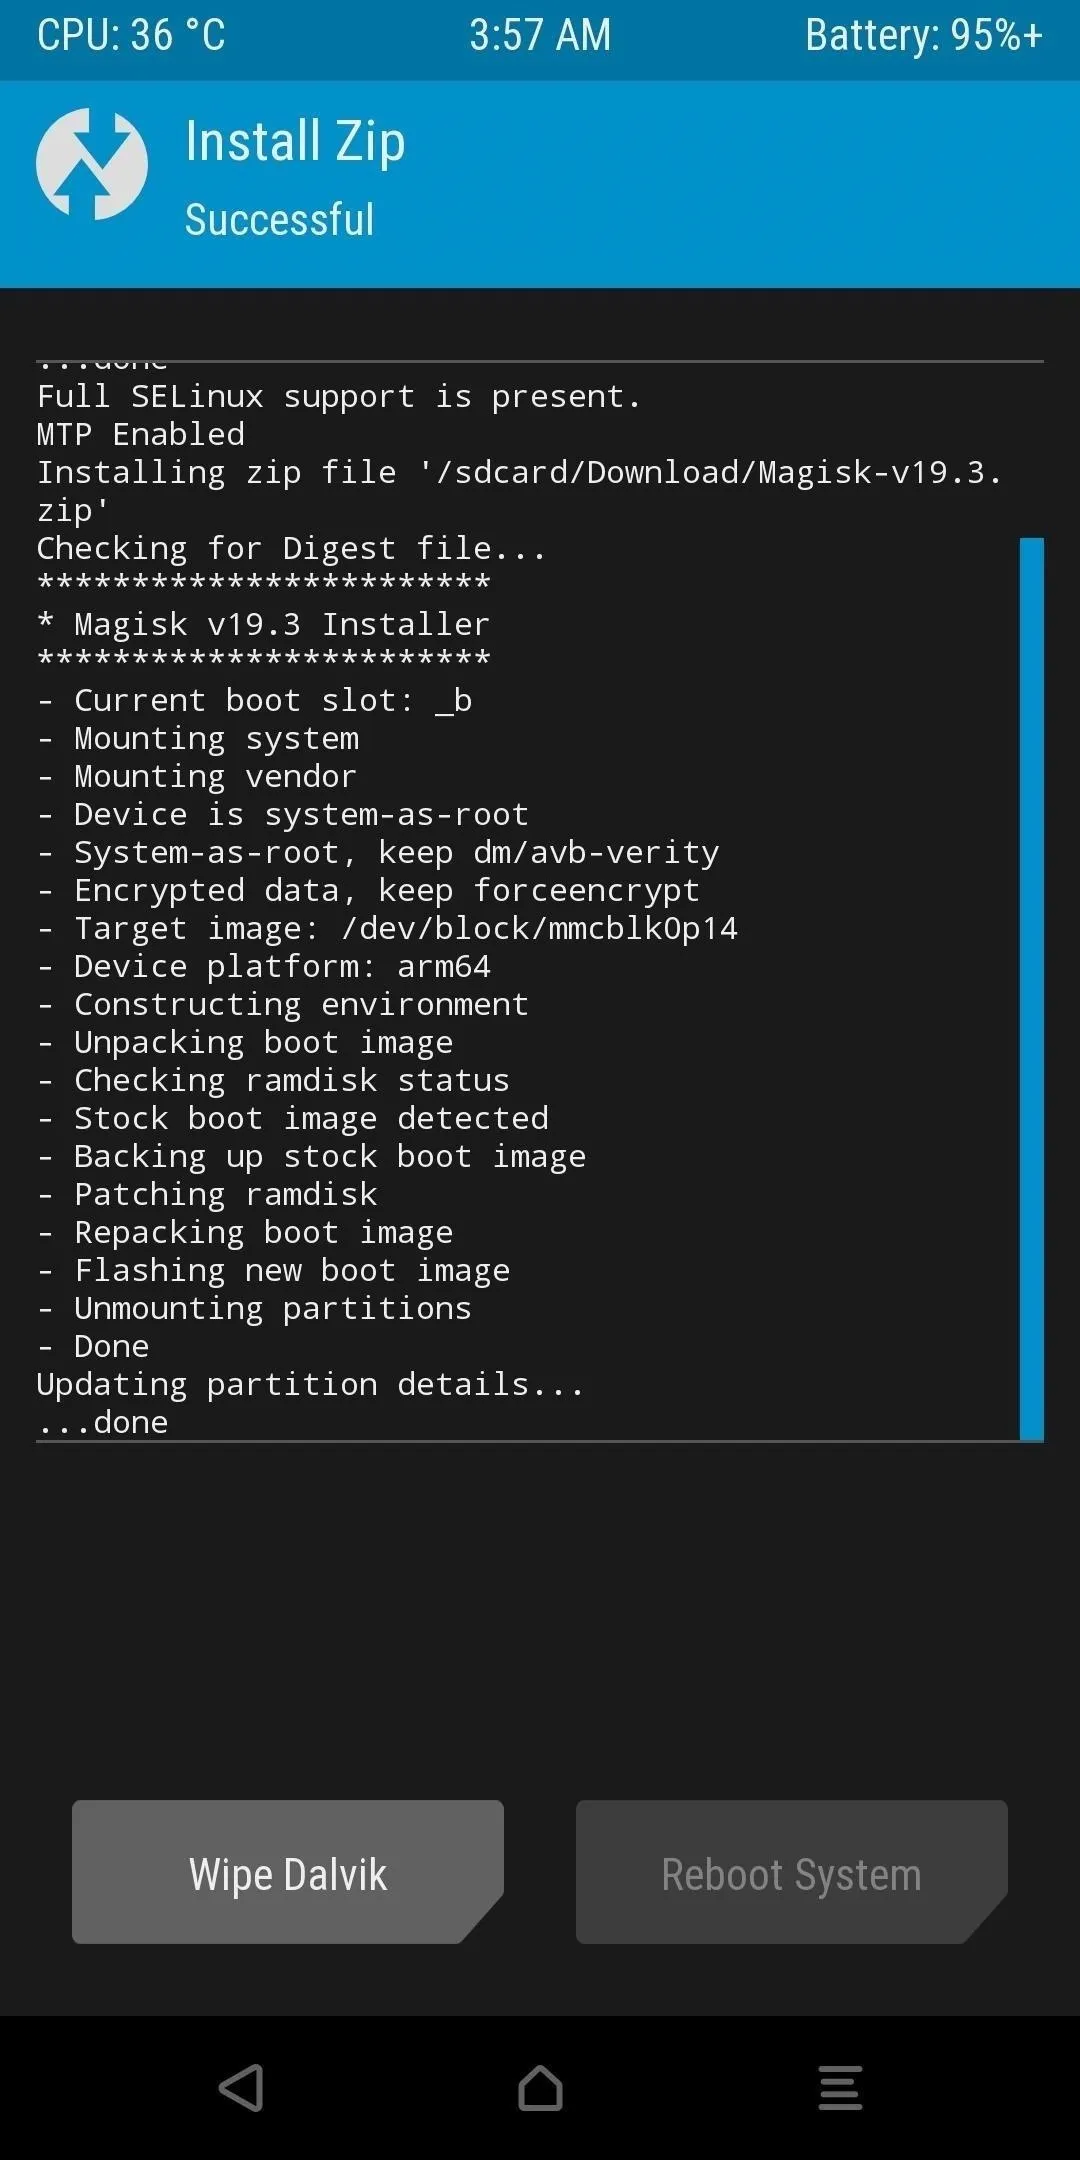
Note: Should you ever find yourself in a bootloop after installing anything in TWRP, try flashing Magisk again to resolve your booting issues. The way new devices work with the A/B system partition, the device won't boot if Magisk is not currently installed on the active slot after a reboot. So don't worry — your device isn't bricked, and your data should be safe and sound as expected!
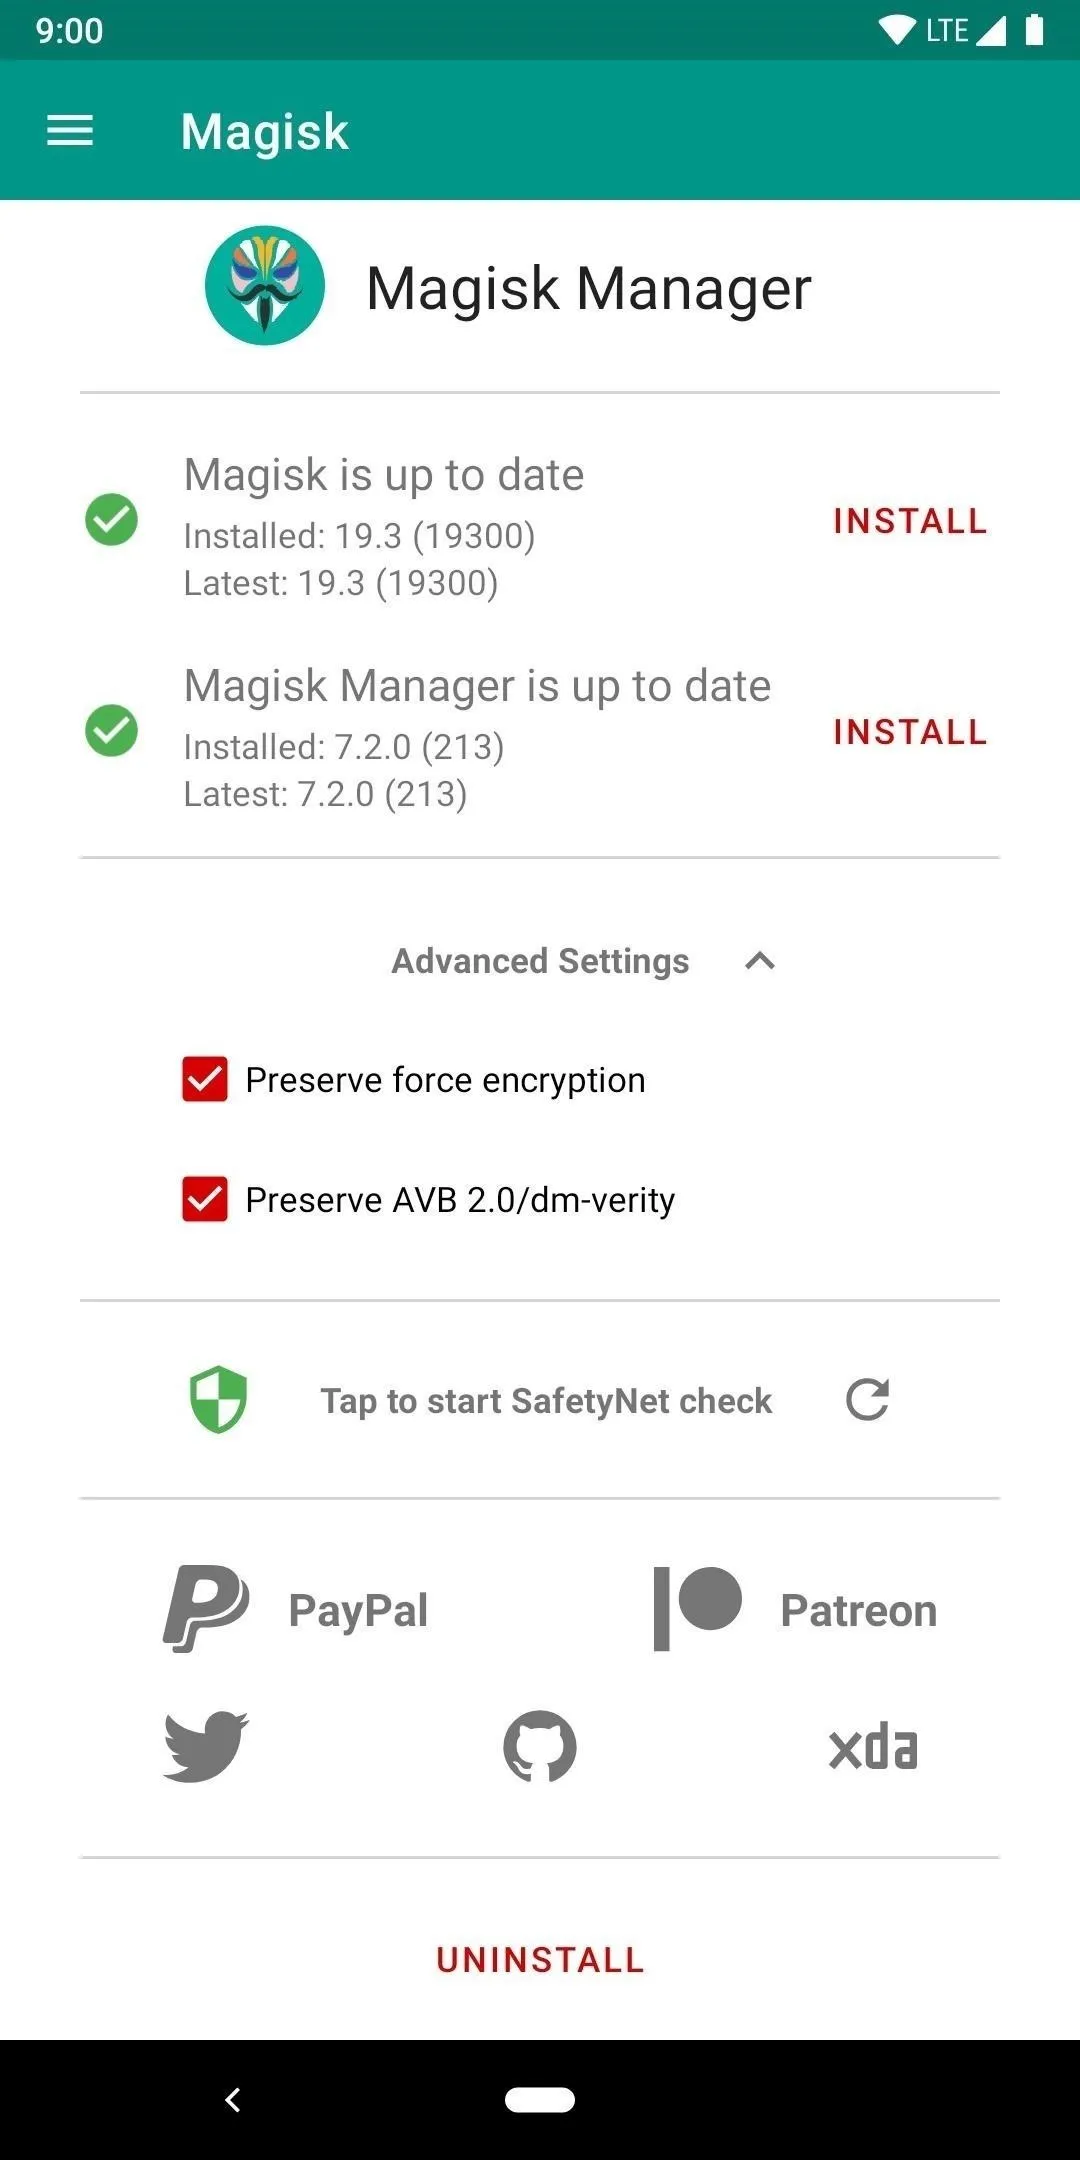
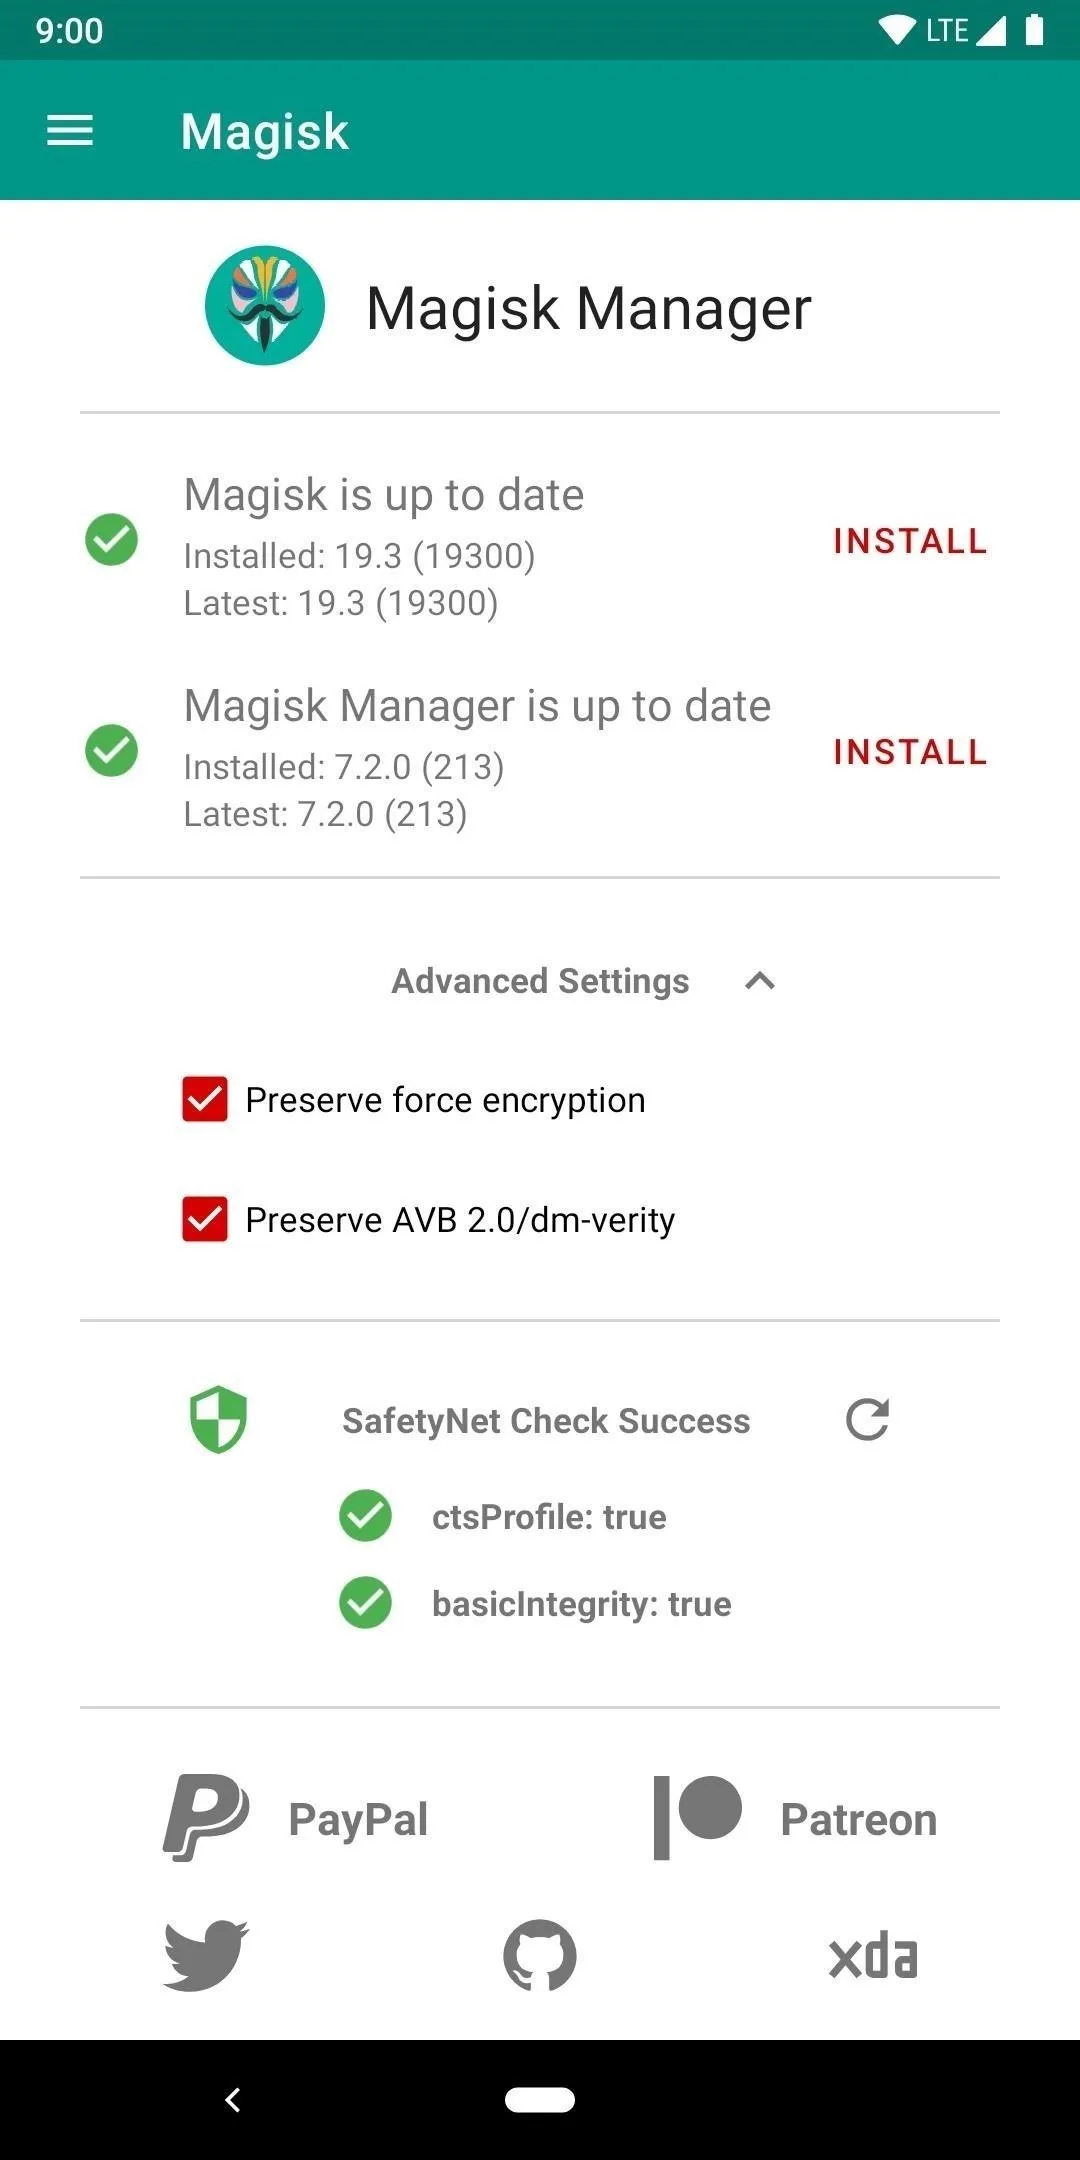
Verify Root & SafetyNet Status
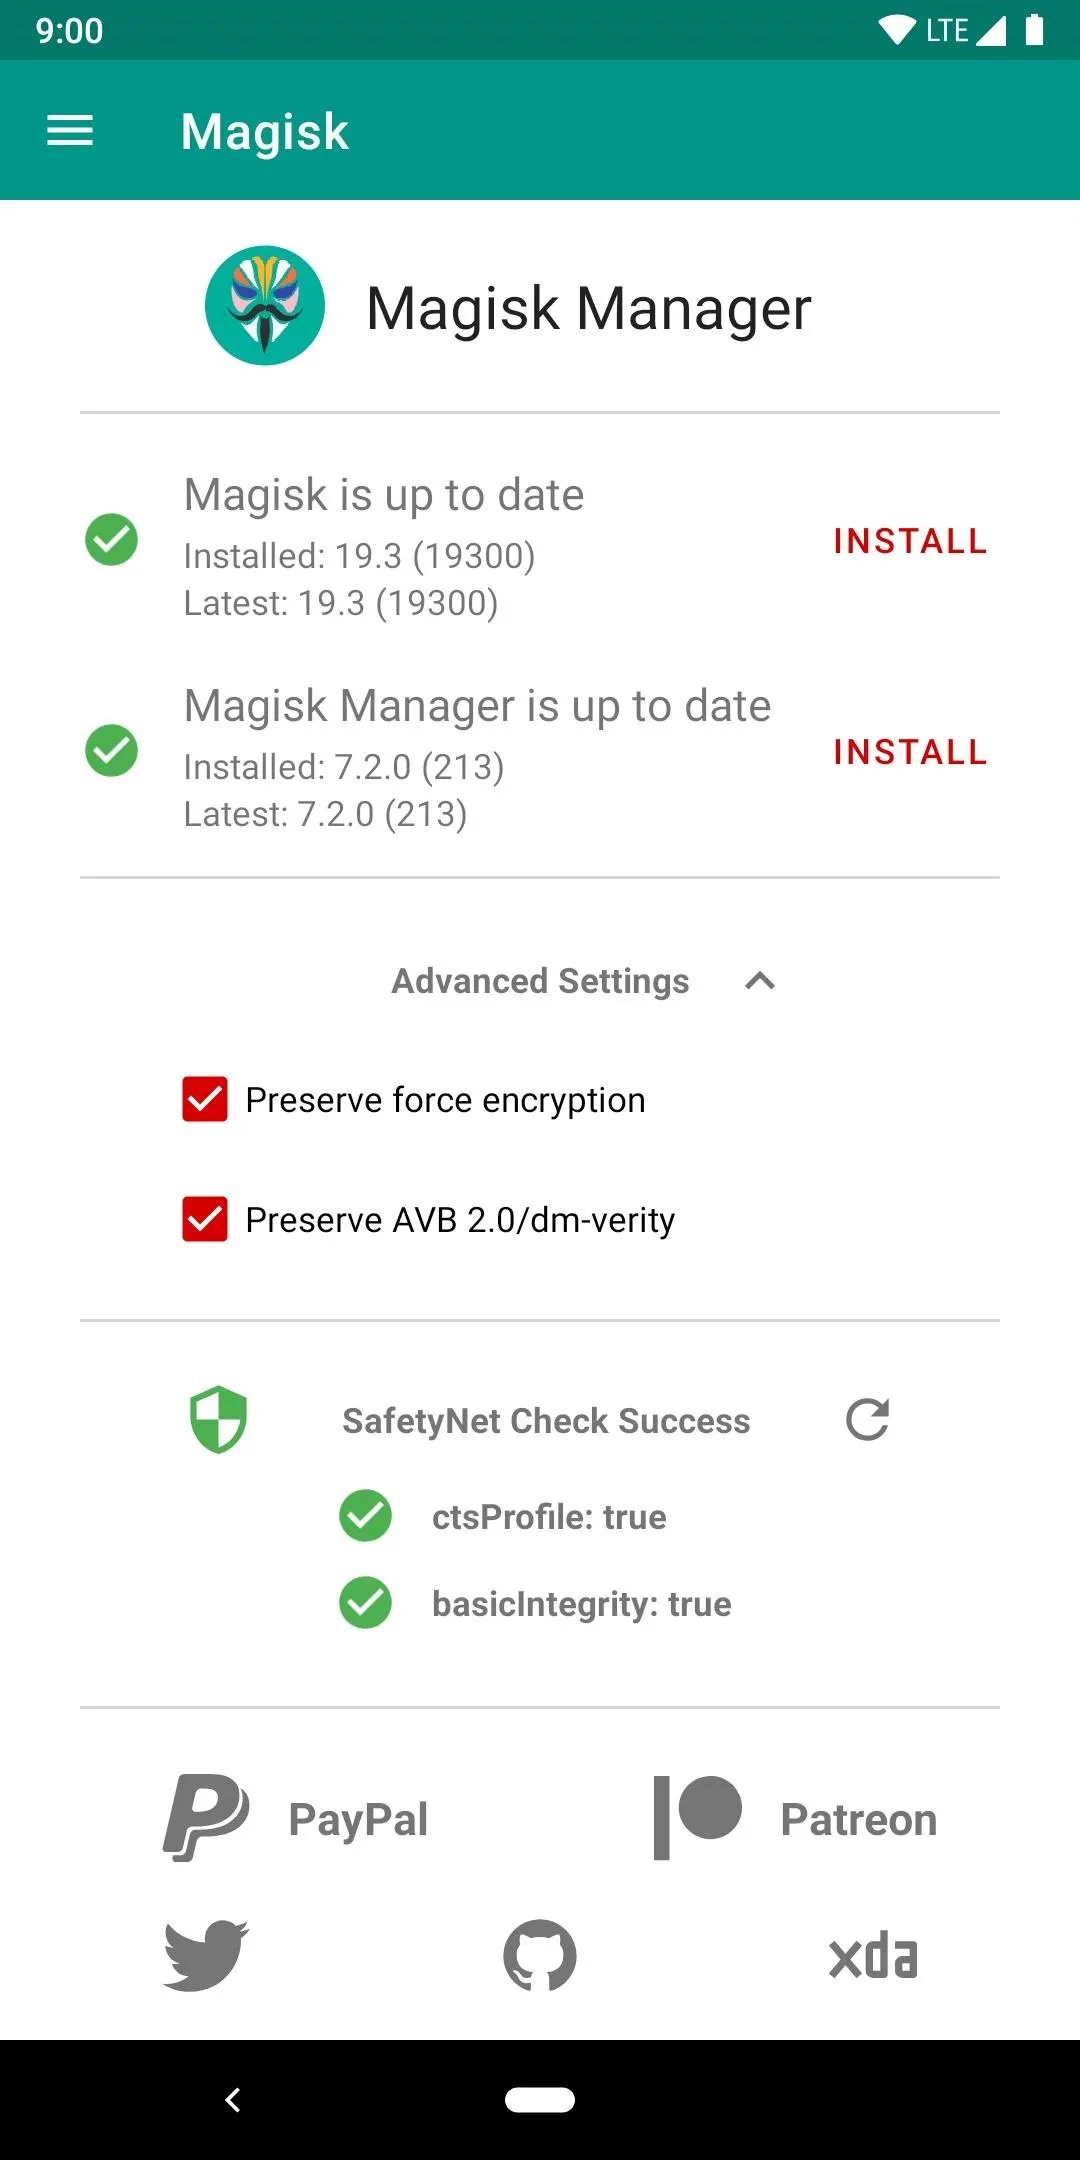
Last but not least, after your phone reboots, head back into the Magisk Manager app. You'll want to then make sure you have both green check marks for "Latest Version" and "Installed Version." You'd also want to tap the arrow next to "Tap to start SafetyNet check" to ensure you pass Google's SafetyNet check. All set! Enjoy root access on your Pixel 3a.
Root Manually
As mentioned previously, if you prefer to manually install updates or take the long way around, then this will be your best bet. If anything, you could also try doing it manually if you've never done it before as a learning experience — it's always good to learn how to do things manually. Since most new devices don't initially have TWRP support needed for the easy way out, this can be beneficial.
Download the Factory Images
Once you have your bootloader unlocked and ready to go, you'll then need to download the factory image for your specific device model. Head to a computer for this part to keep things simple. Click the download link below for the newest version for either your Pixel 3a or 3a XL. You'll have to scroll down past the flashing instructions section to find where the downloads section starts.
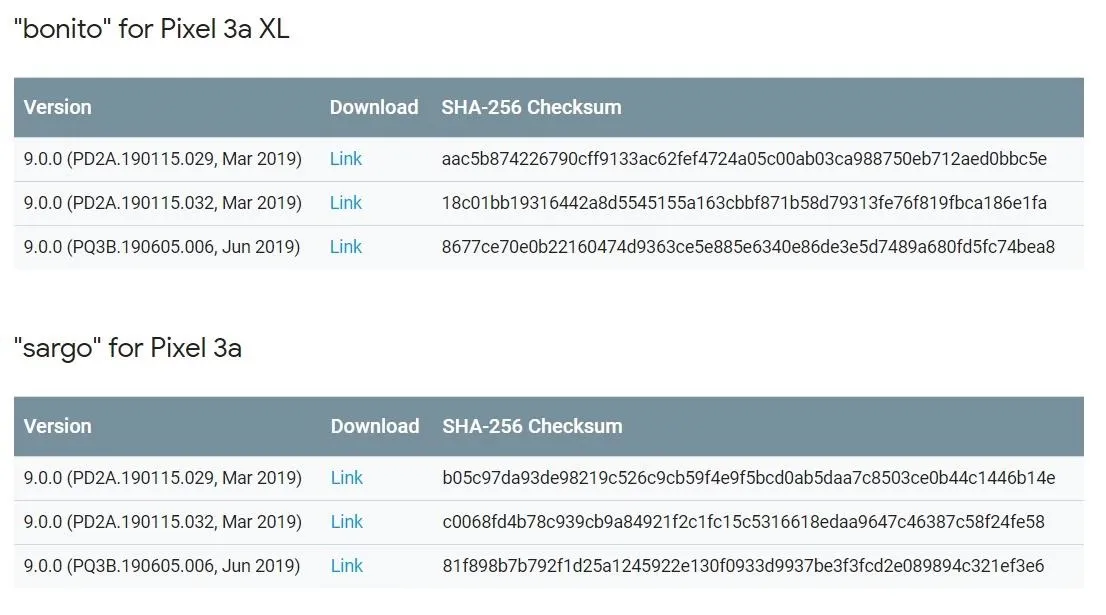
The factory images are large in size since it includes the entire Pixel OS itself, but for this guide, you only need one particular file from the package.
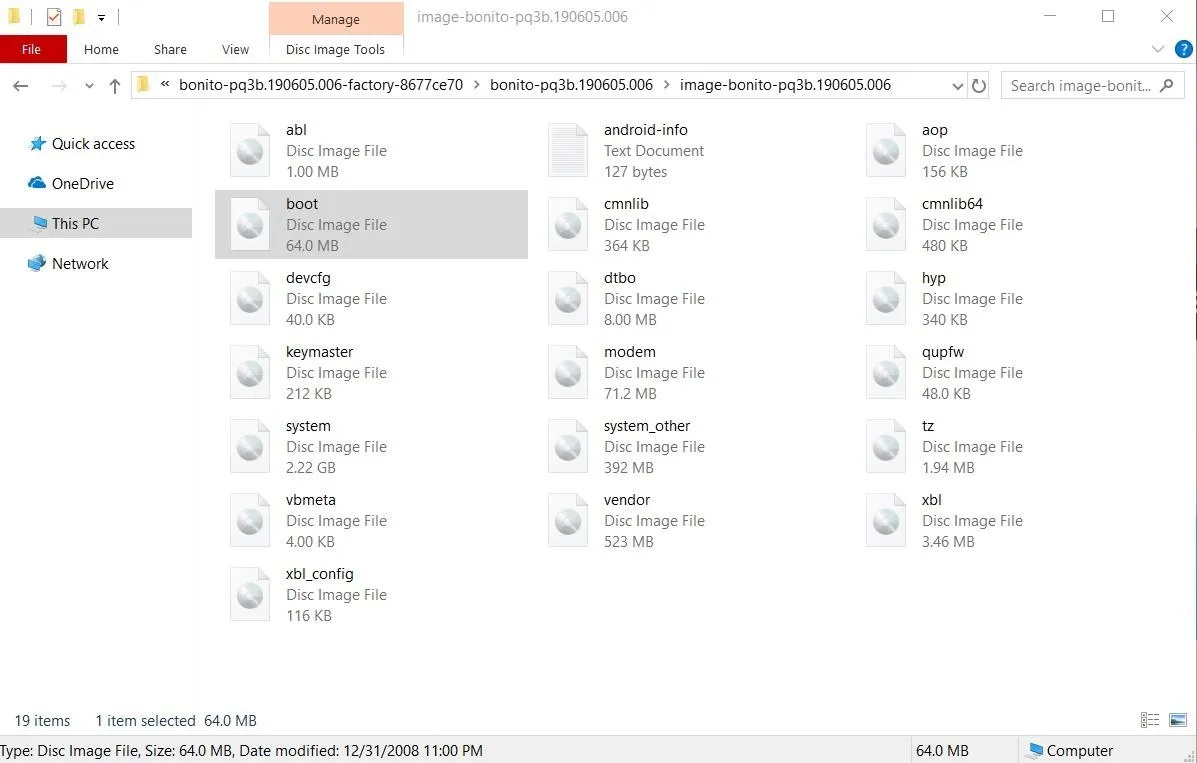
Extract the Boot Image
After the entire factory firmware package has been downloaded onto your computer, extract the folder to any location of your choosing. Once extracted the first time, look for the only ZIP file in the folder that starts with "image" and then extract that file within the current folder to reveal all the system files.

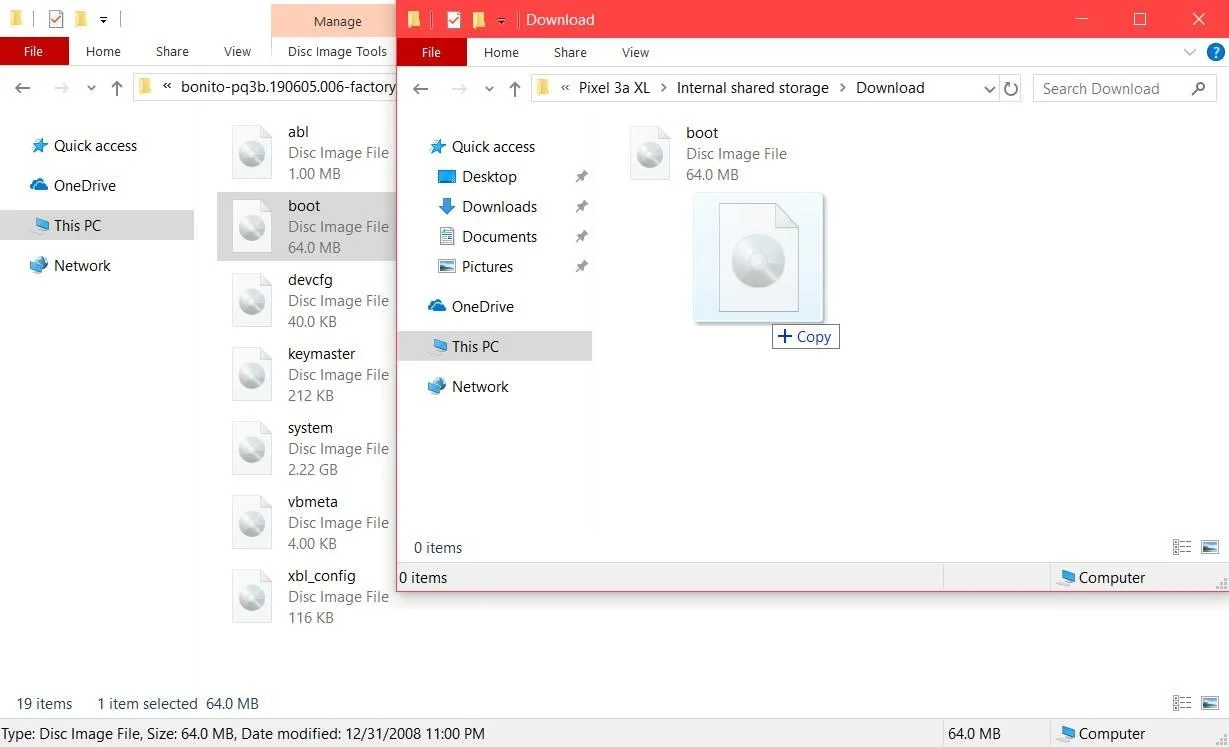
Since you only need to grab one image file from the bunch, look for one named "boot.img" then mount your phone to your computer with a USB data cable.
Now all you need to do is transfer that boot image file from your computer to the "Download" folder on your phone.
Install Magisk Manager
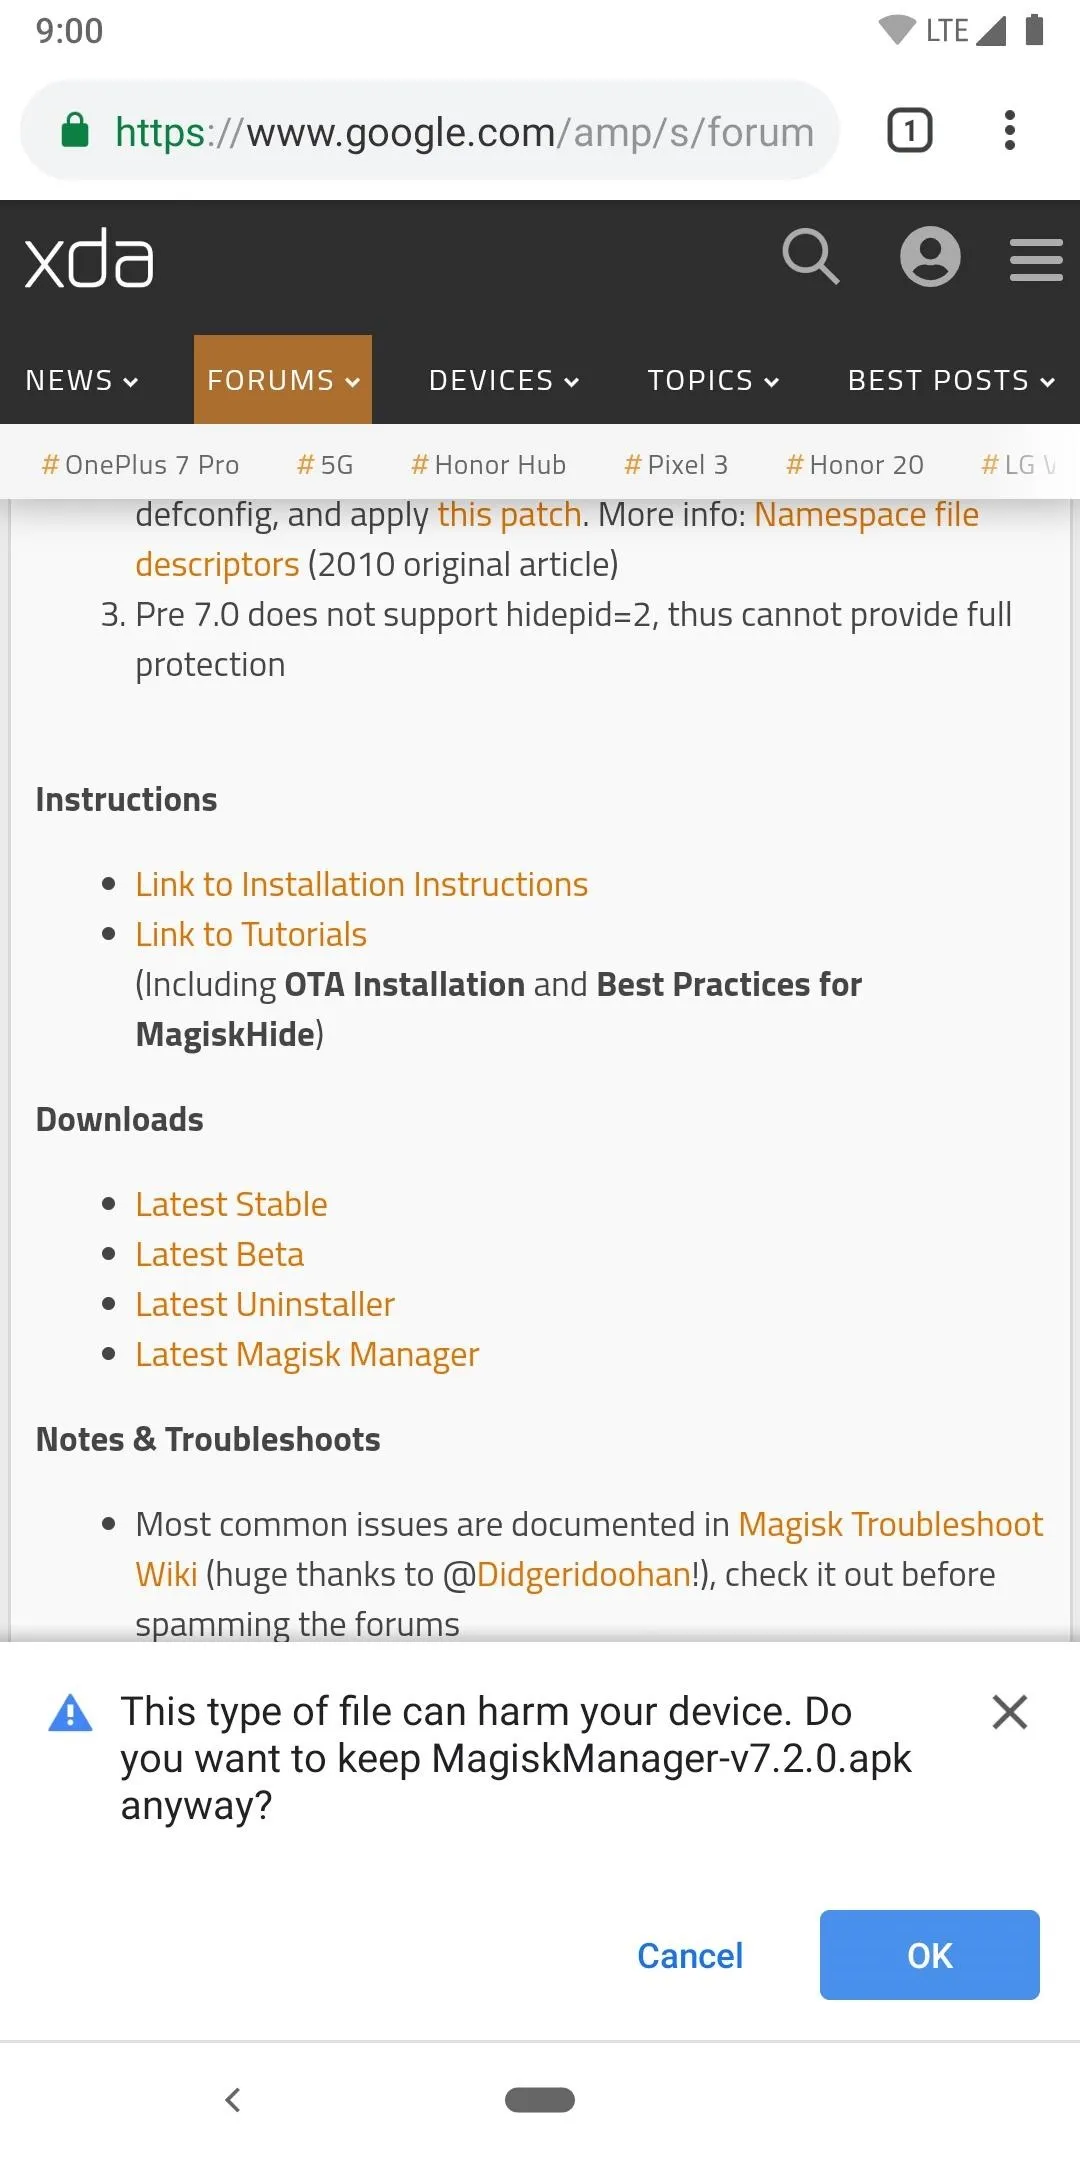
Now that you've made it this far, you can finally start dealing with the Magisk Manager app itself. Download the latest version of the app from the link below.
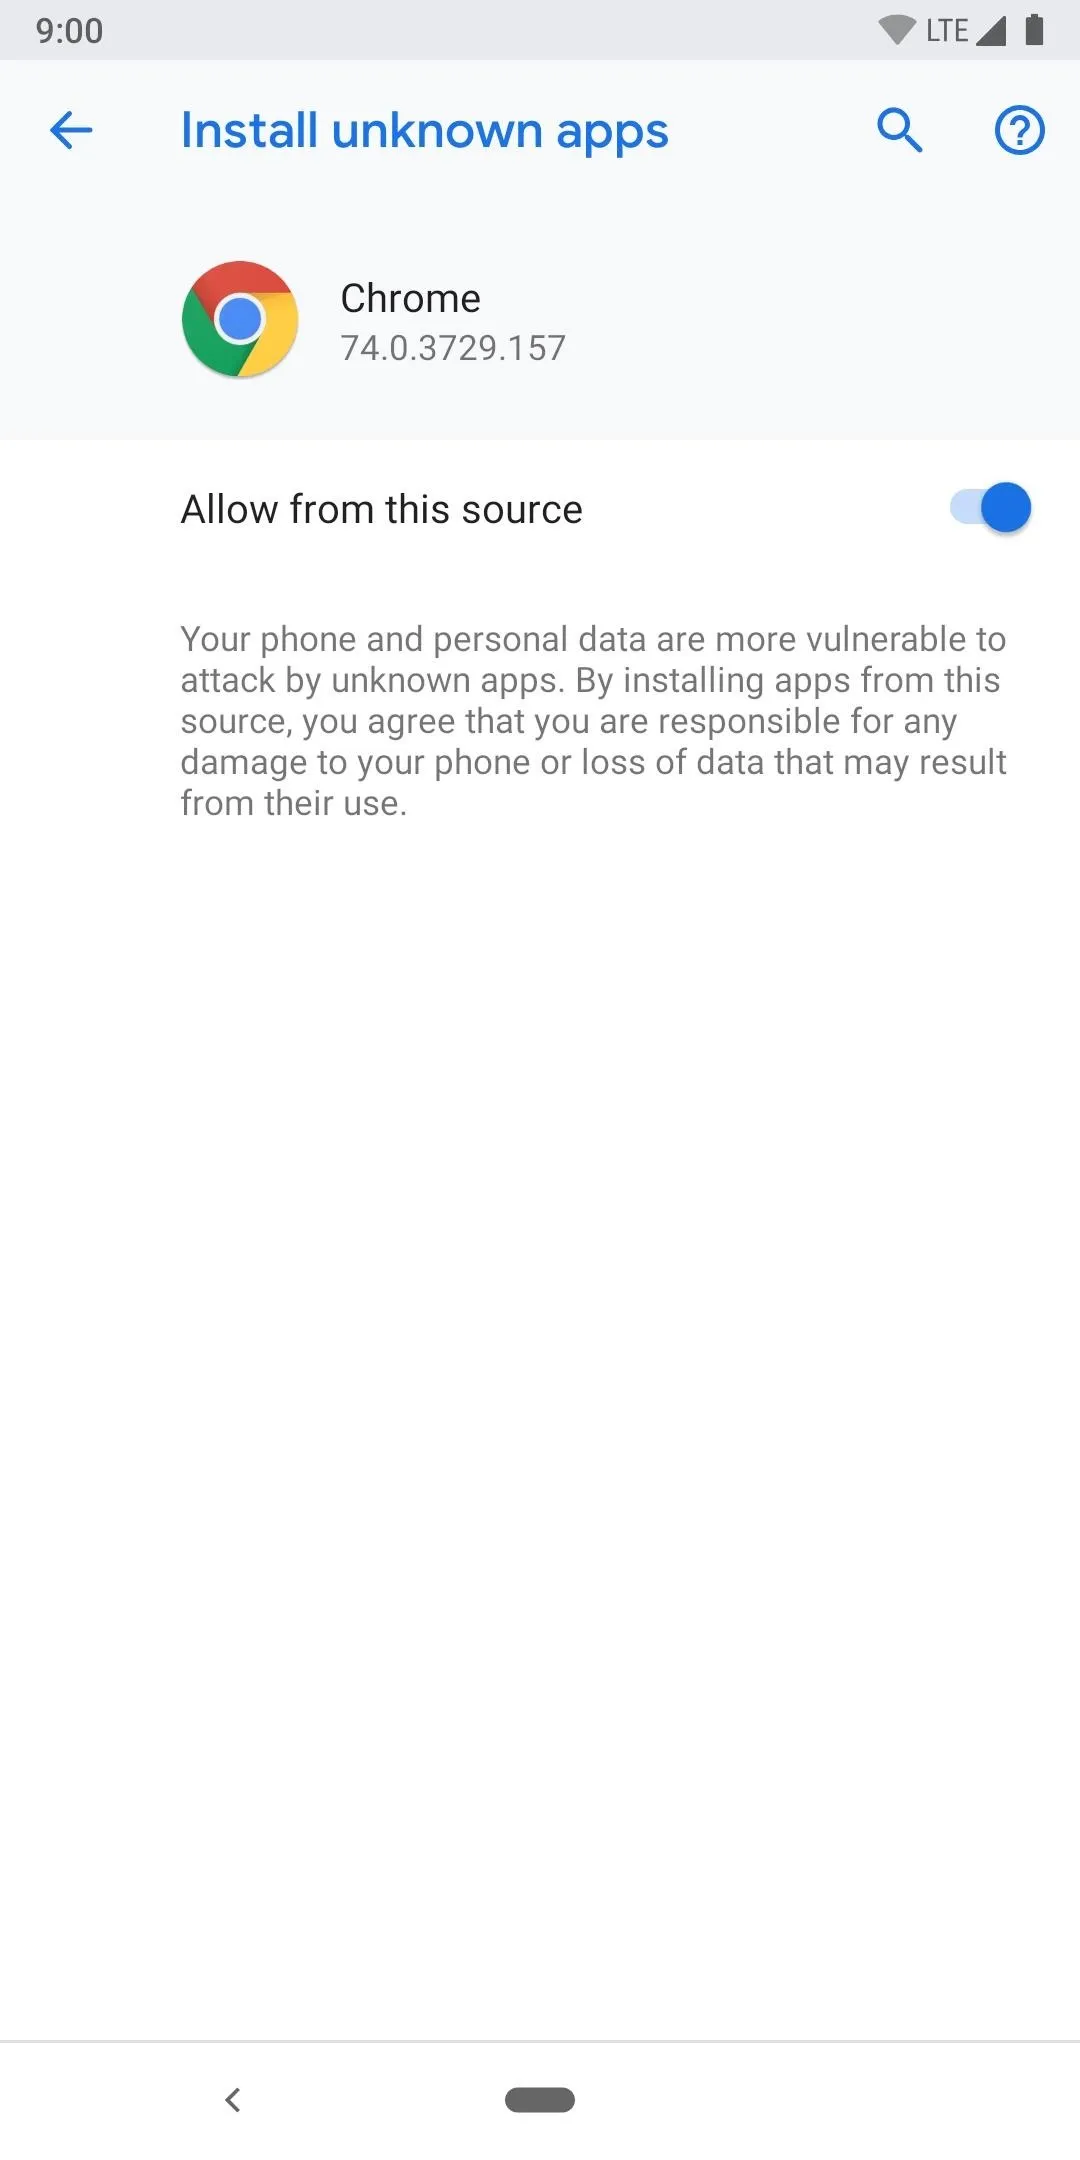
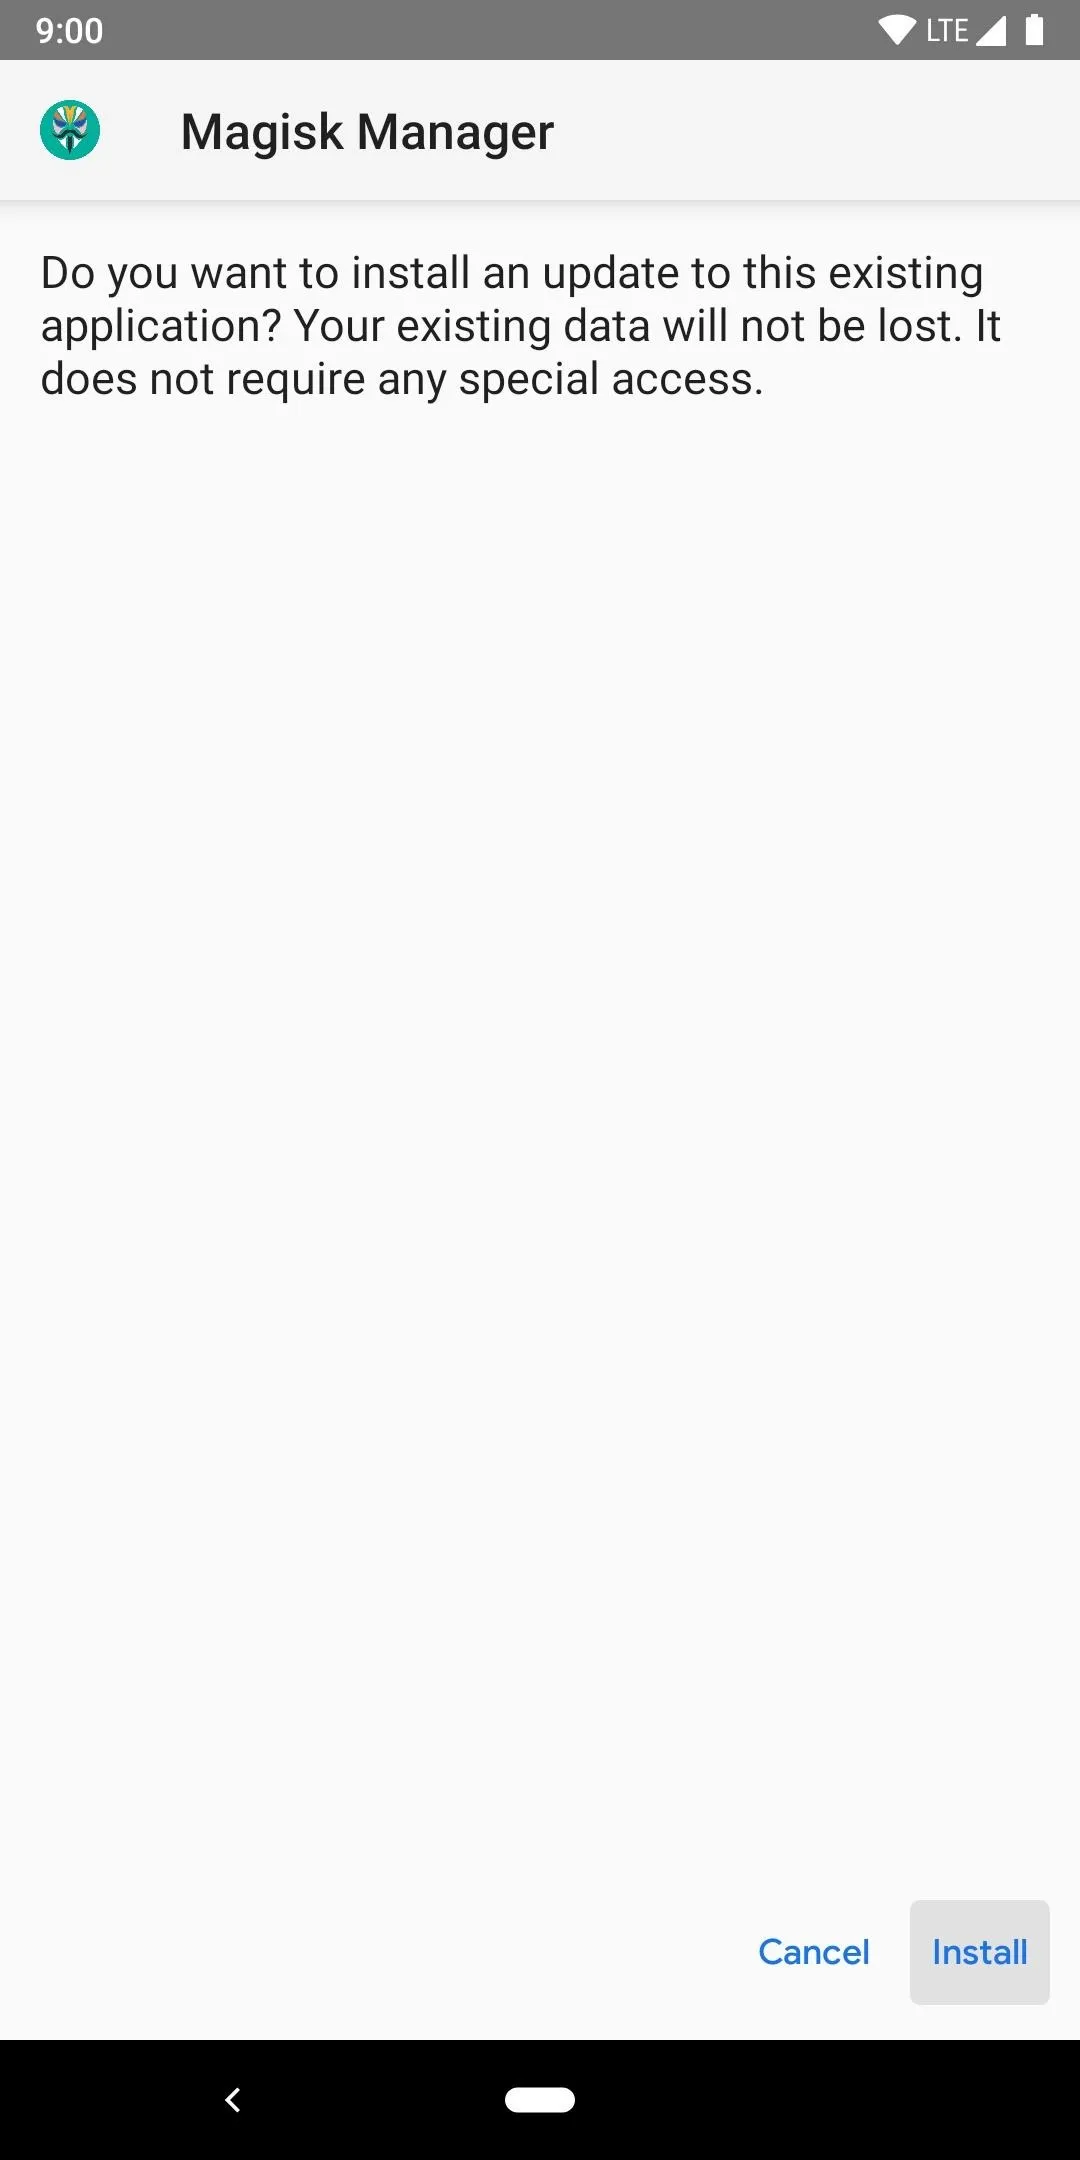
The file is not very large, so the download should be rather quick, but when it's finished, tap the "OK" button followed by "Open." If you are prompted to do so, you'll need to grant Chrome the proper permissions to sideload the Magisk Manager app. Simply tap "Settings," then enable the switch for the "Allow from this source" option. Tap the back button once, and then you can tap "Install."
Patch the Boot Image
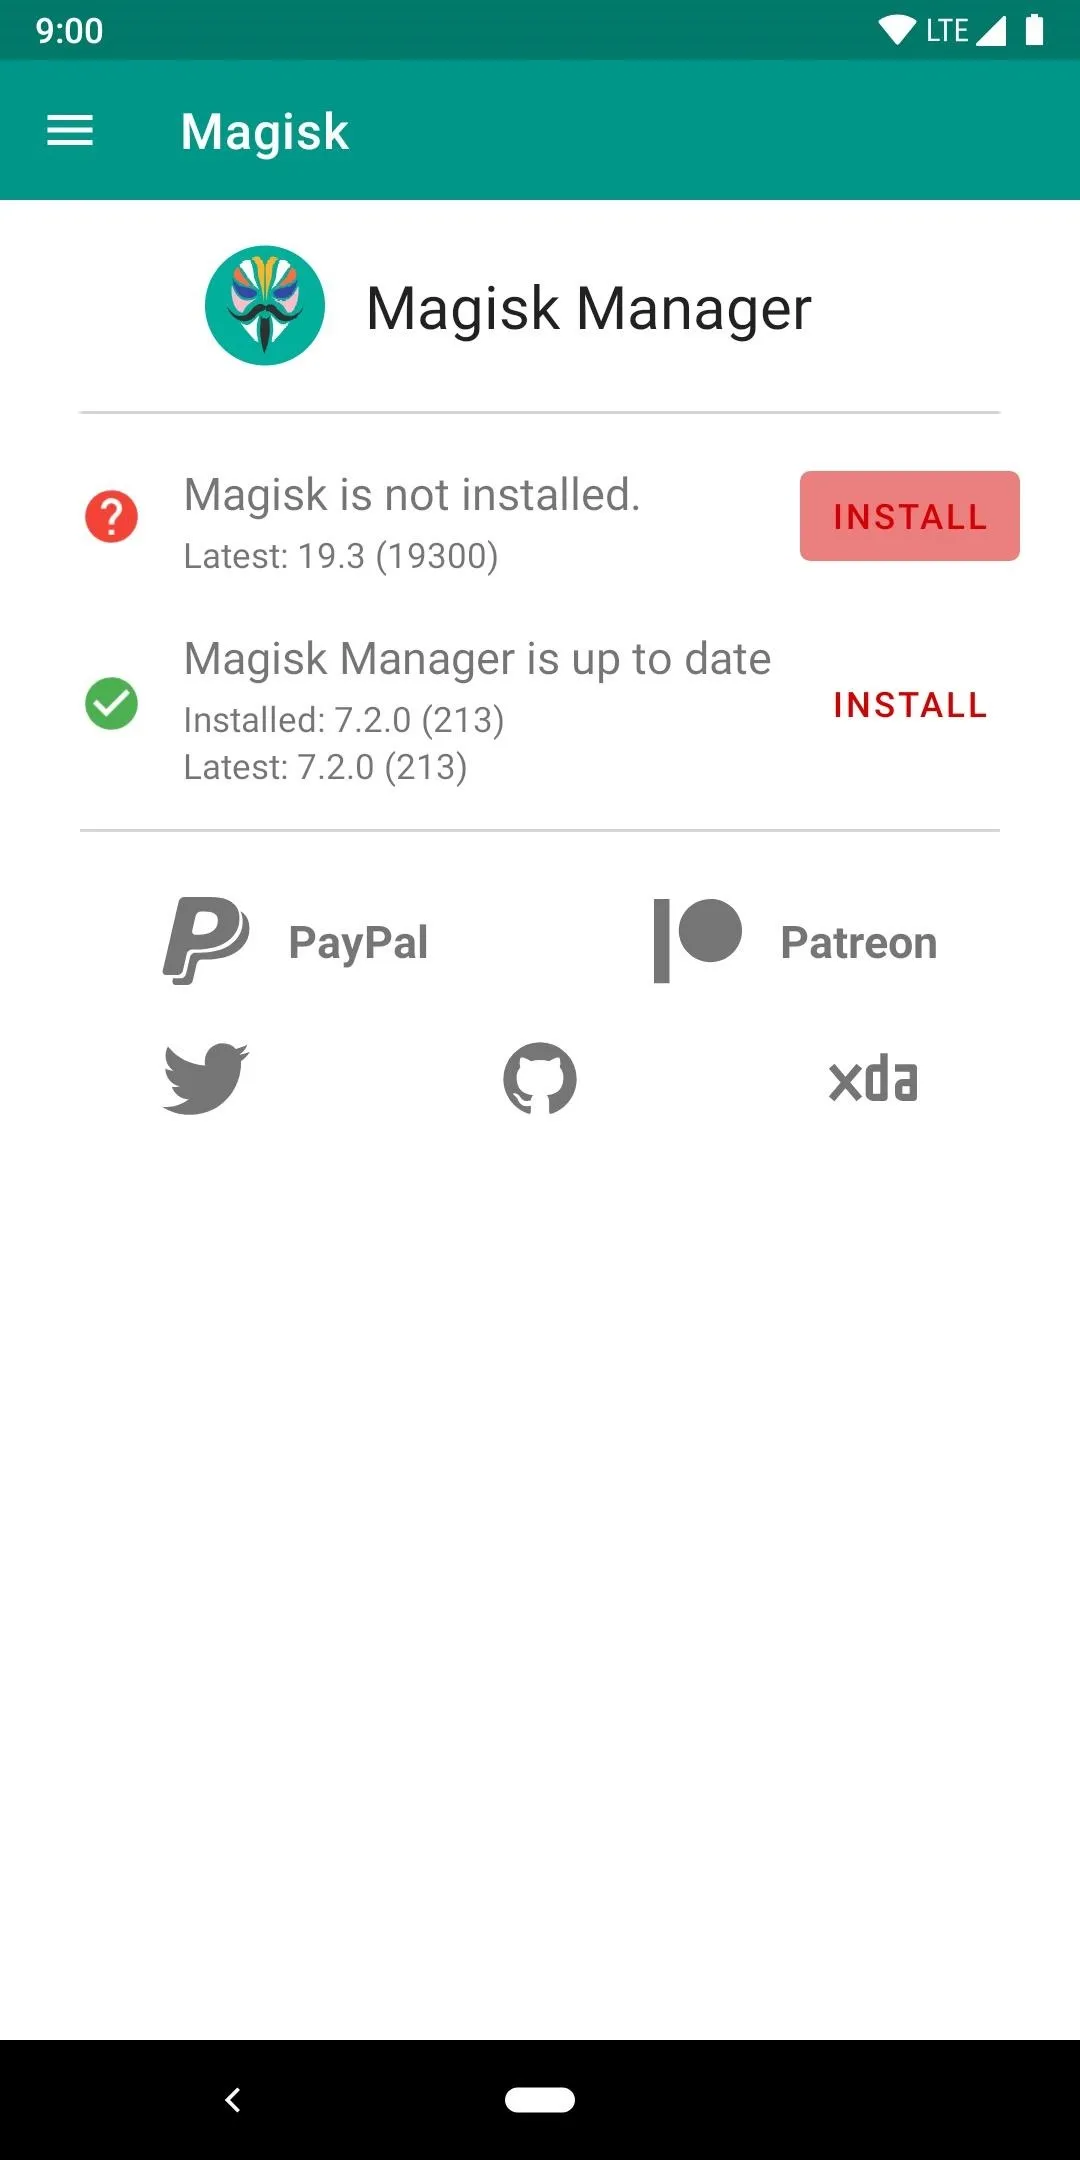
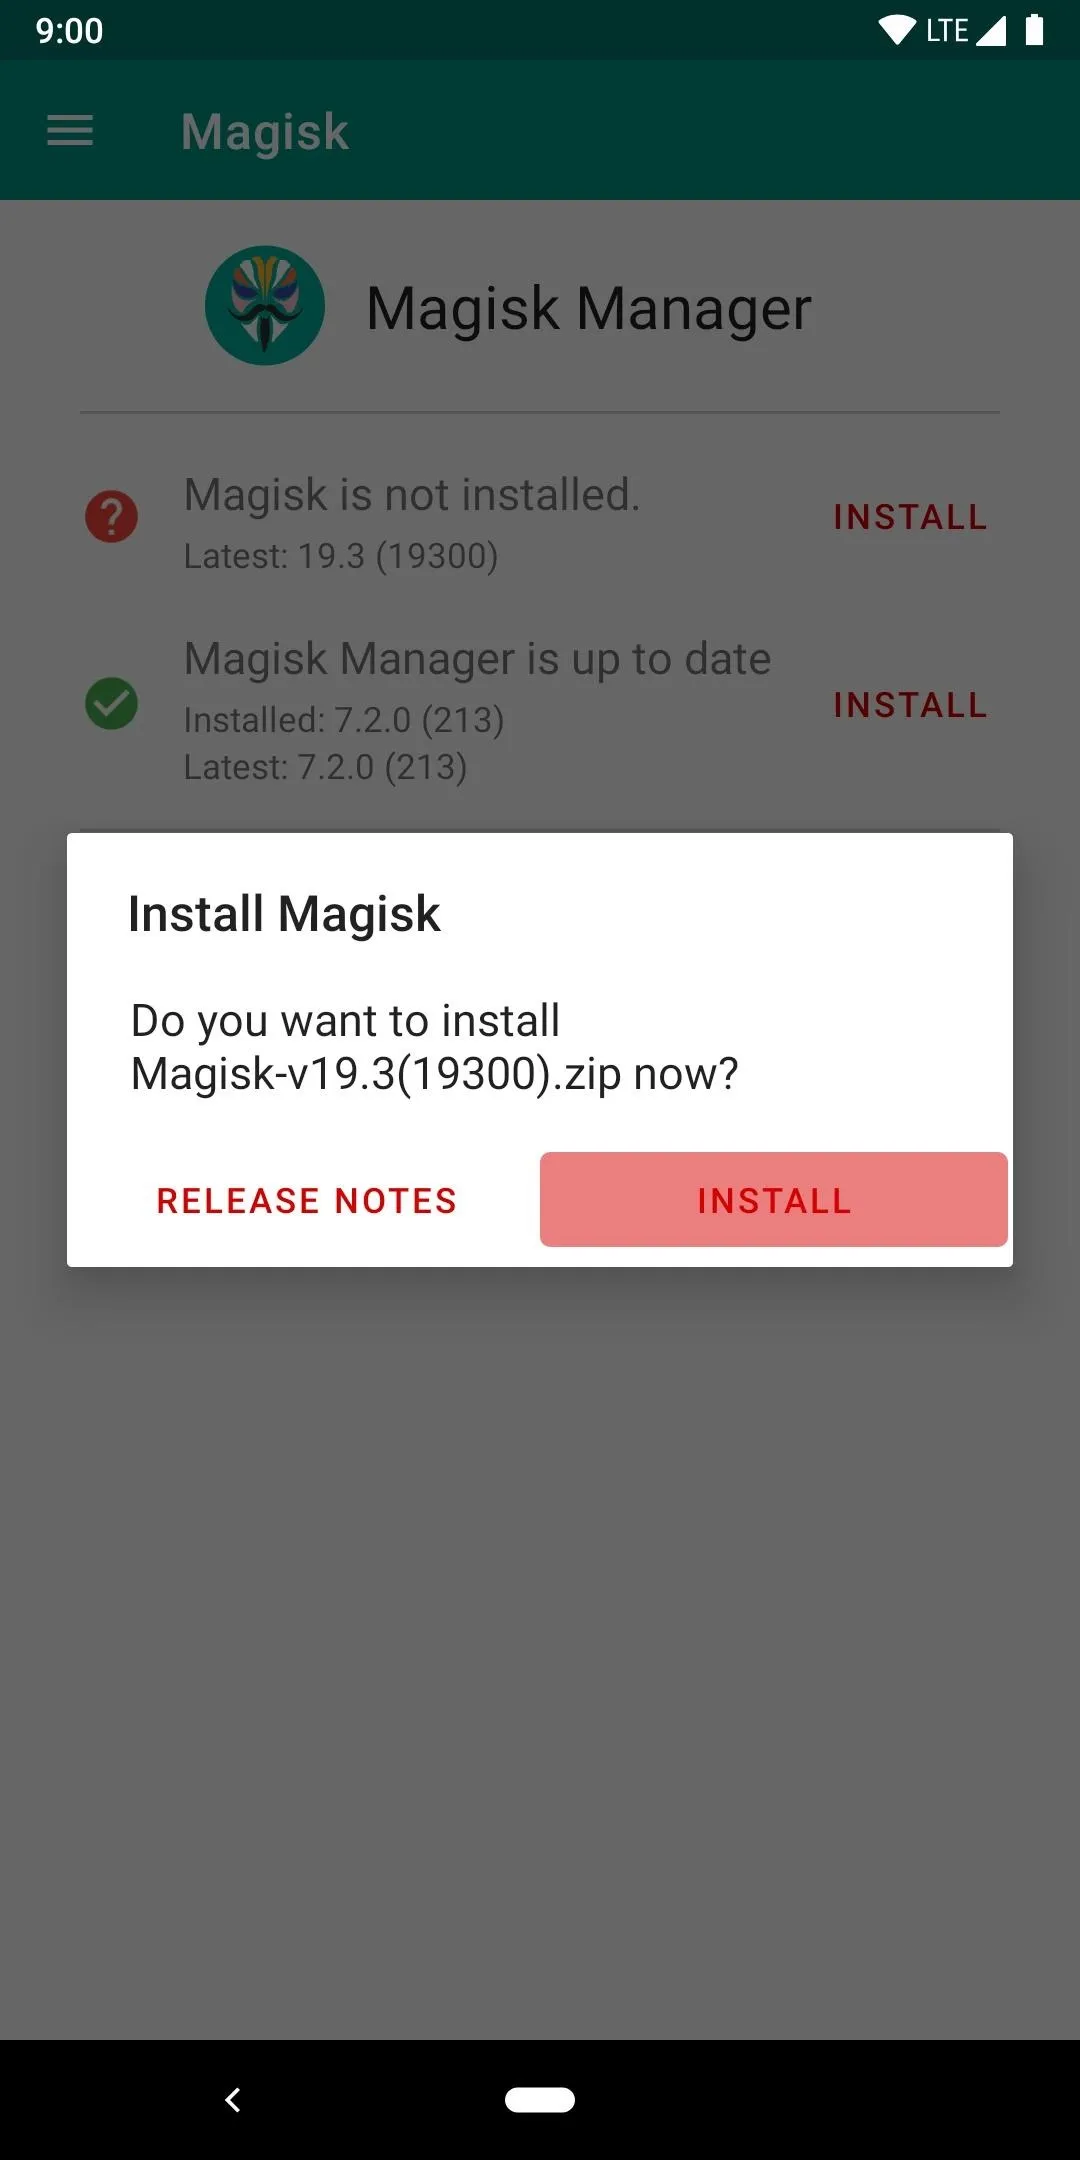
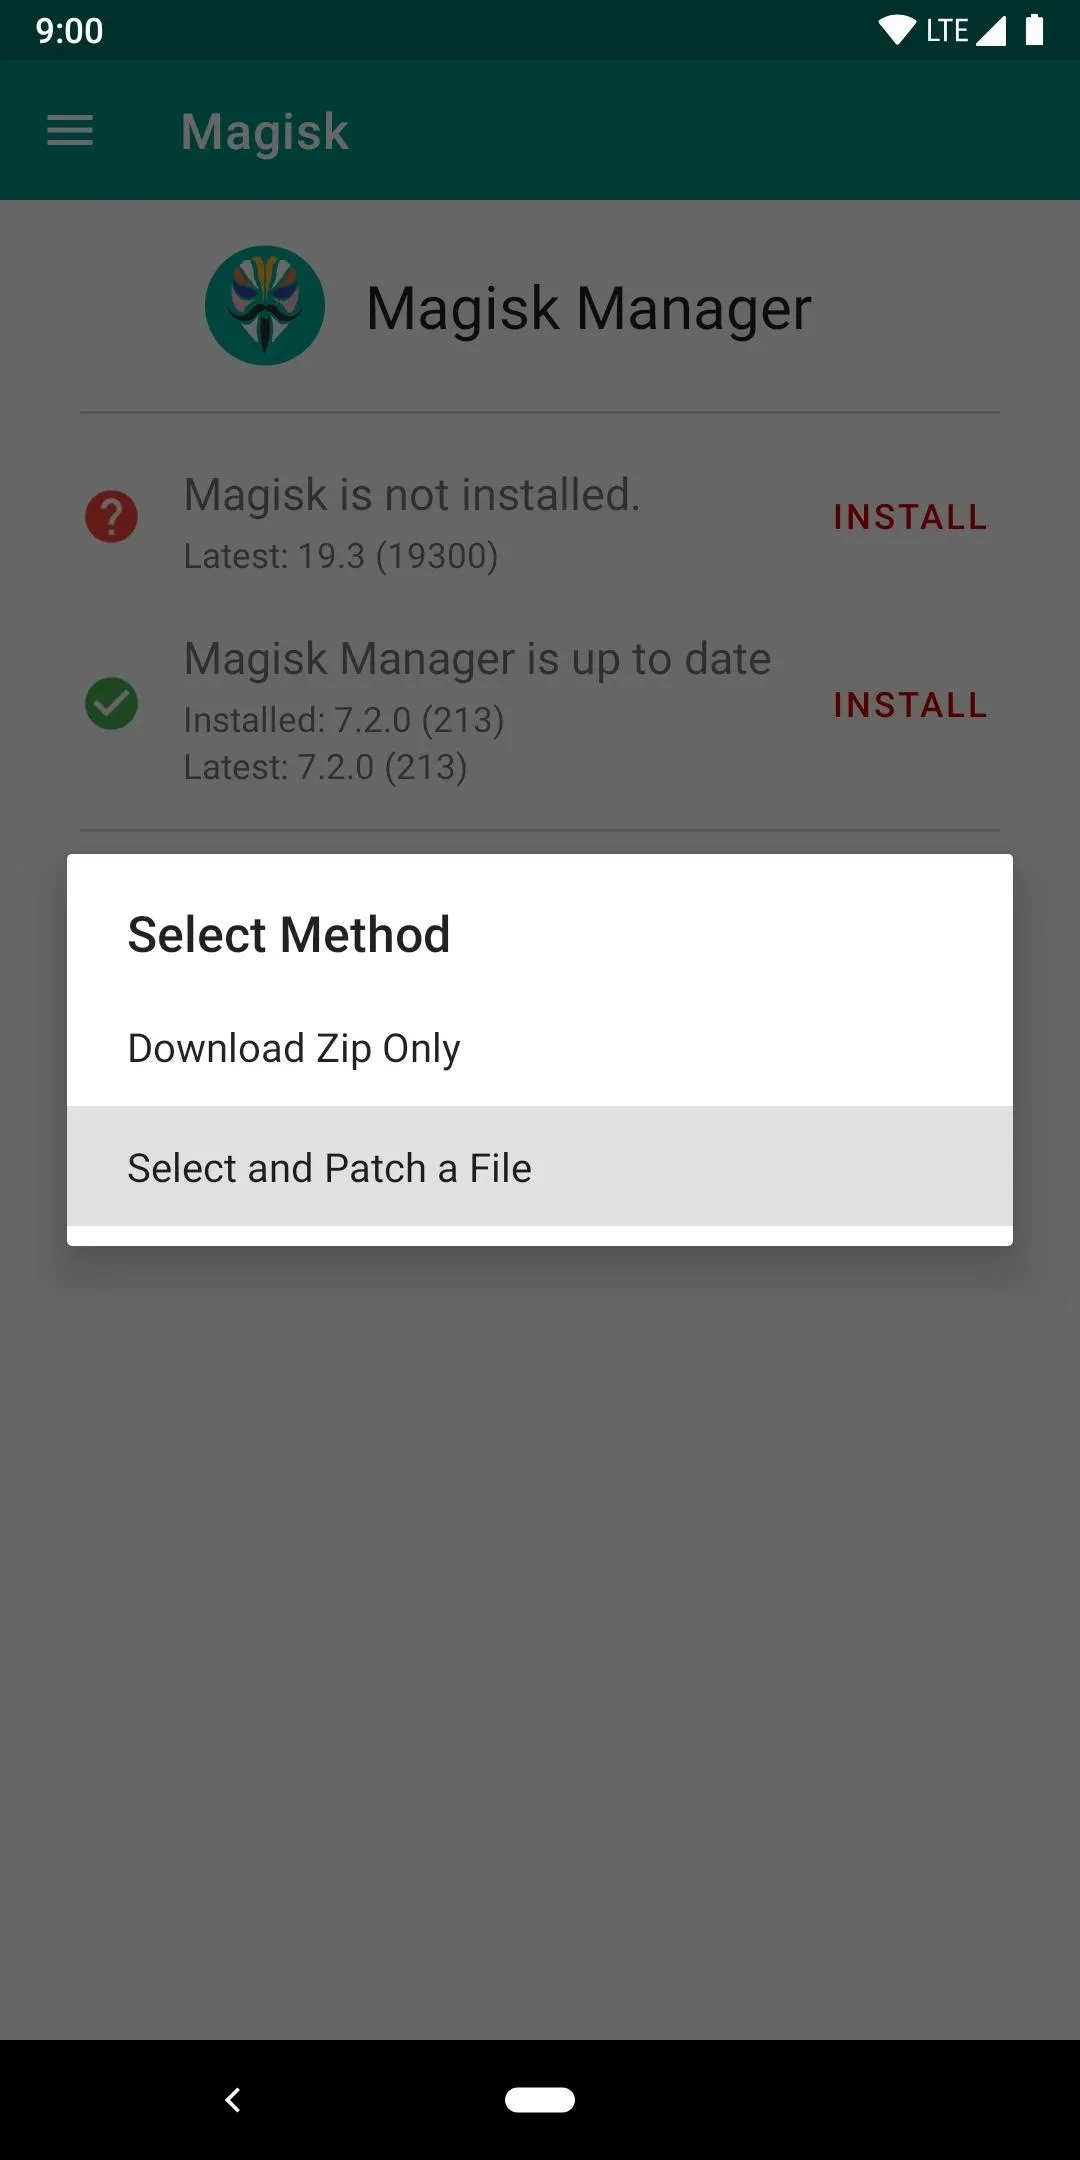
From the main menu of the Magisk Manager app, tap "Install" then tap "Install" again to bring up a new set of options. Choose the "Select and Patch a File" option and then allow the media permissions when prompted to do so by tapping "Allow."
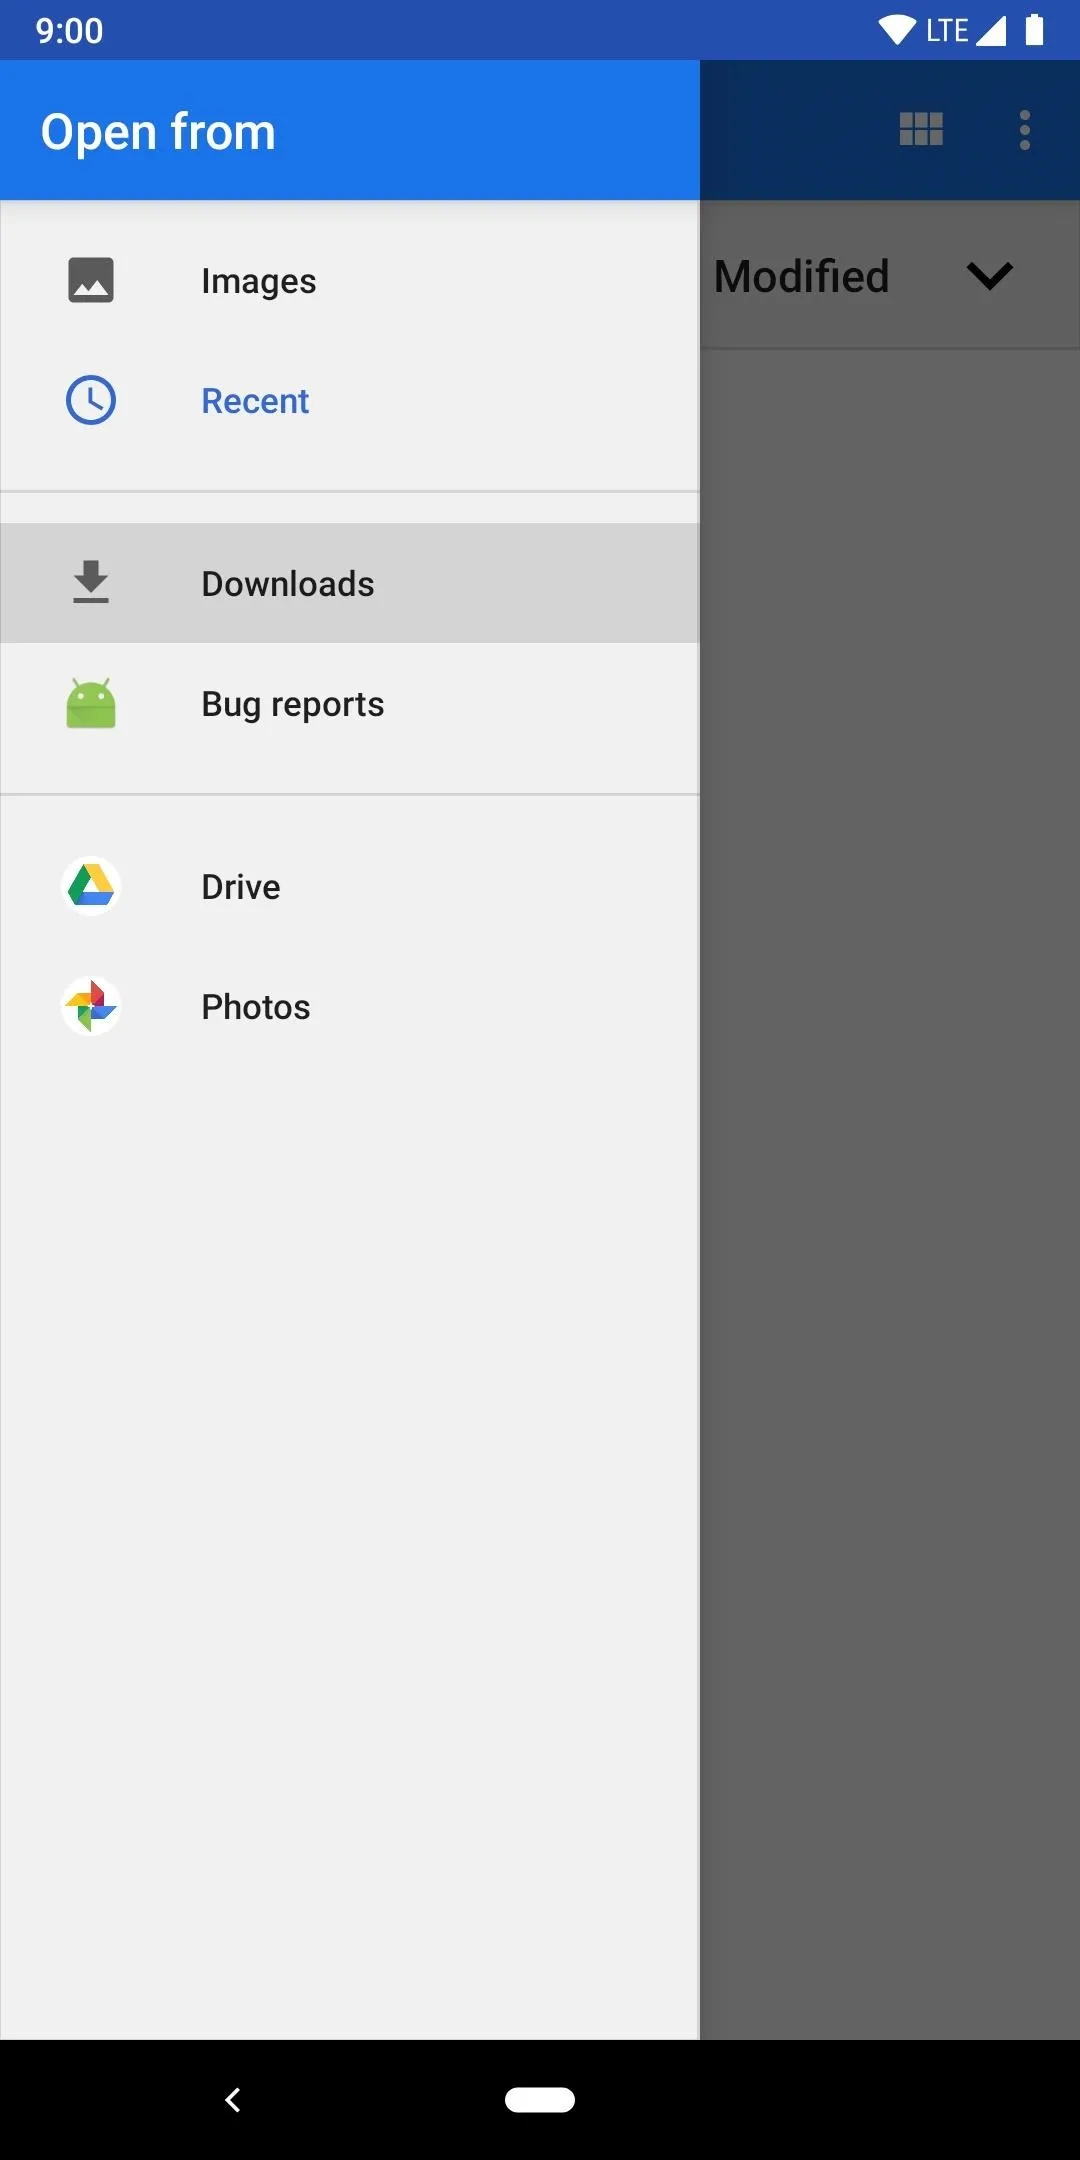
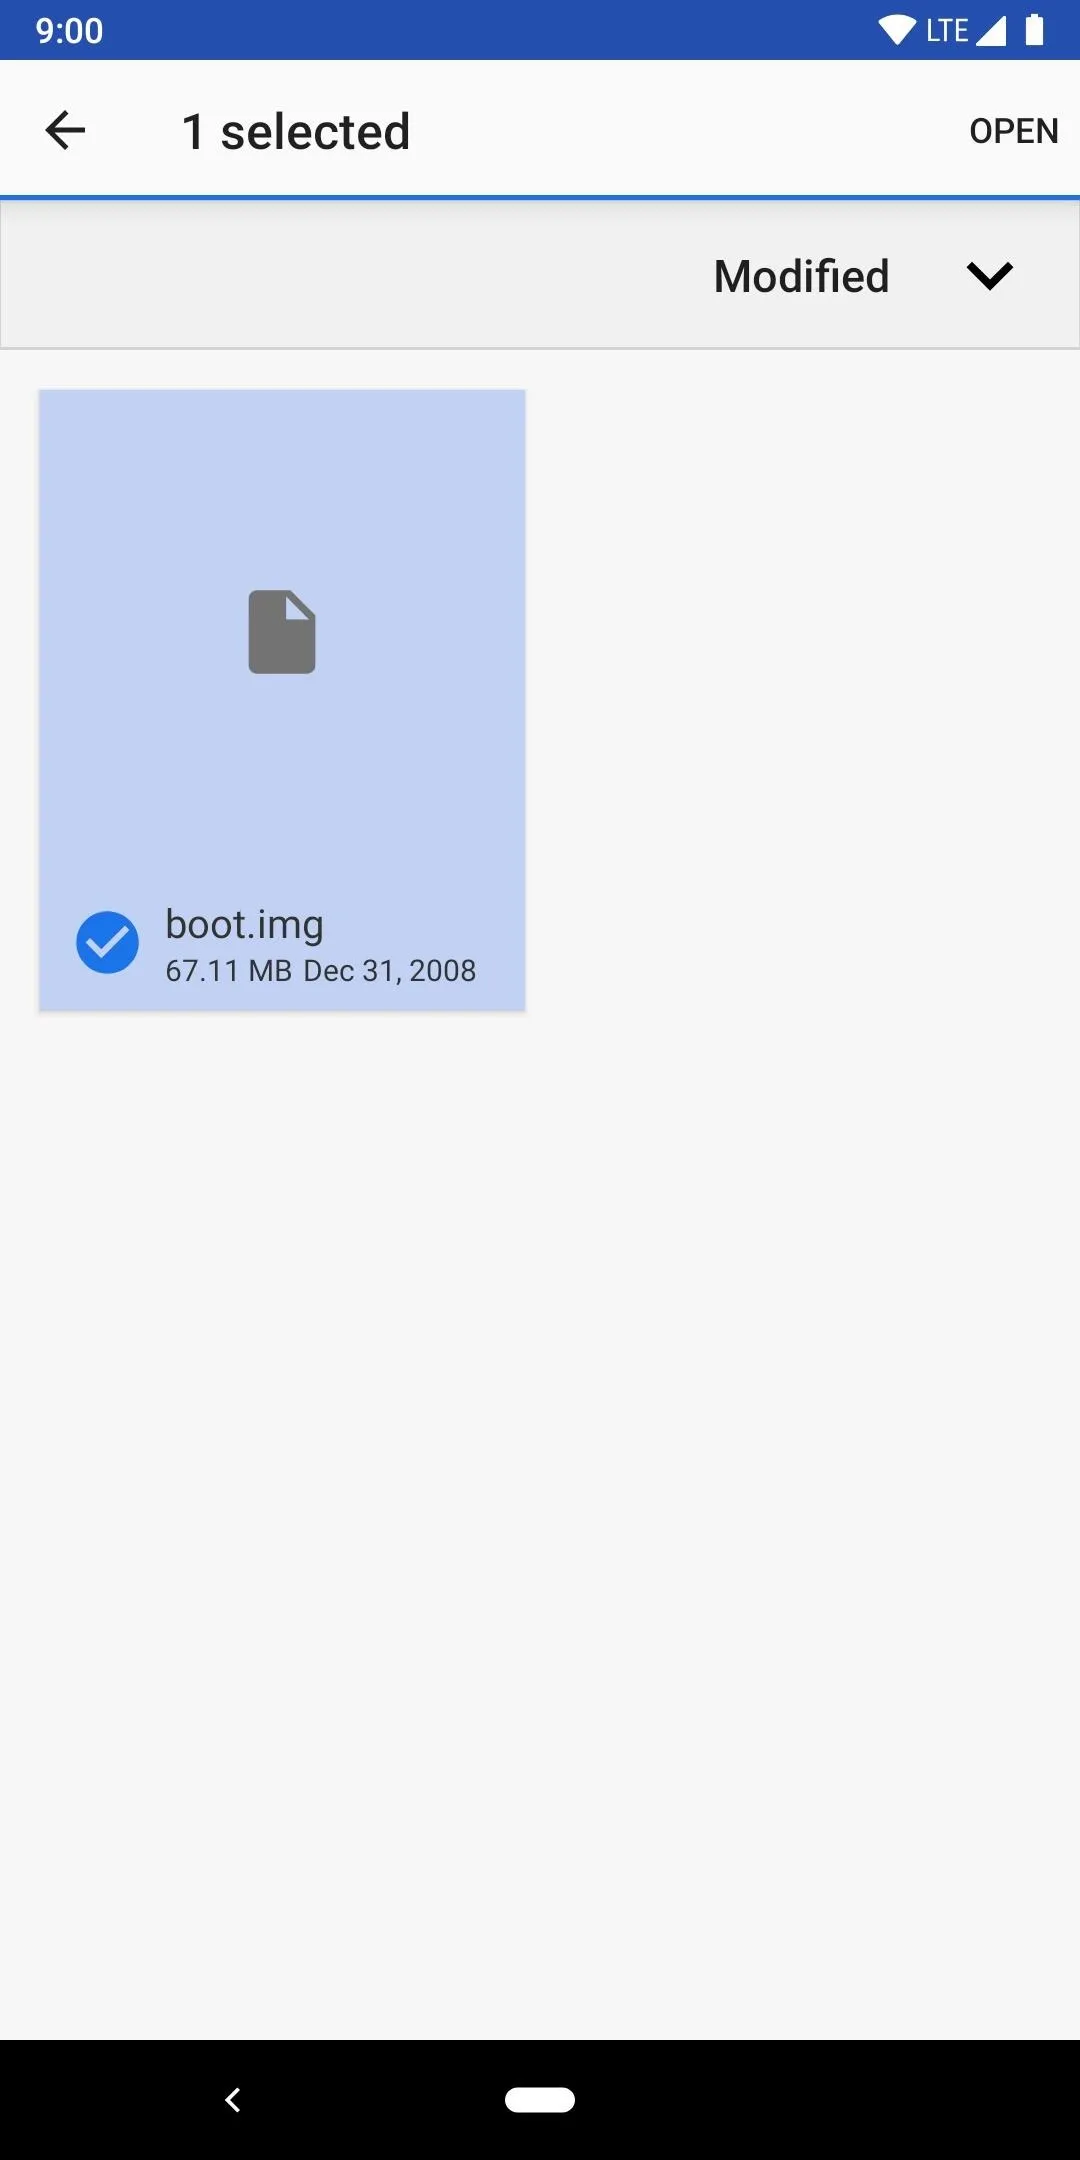
From the file manager that pops up, tap the menu icon in the upper left of the screen, then select "Downloads." Select the "boot.img" file, then Magisk will begin patching it within about a minute or so. Once it finishes patching the file, go ahead and tap the back arrow to complete the process.
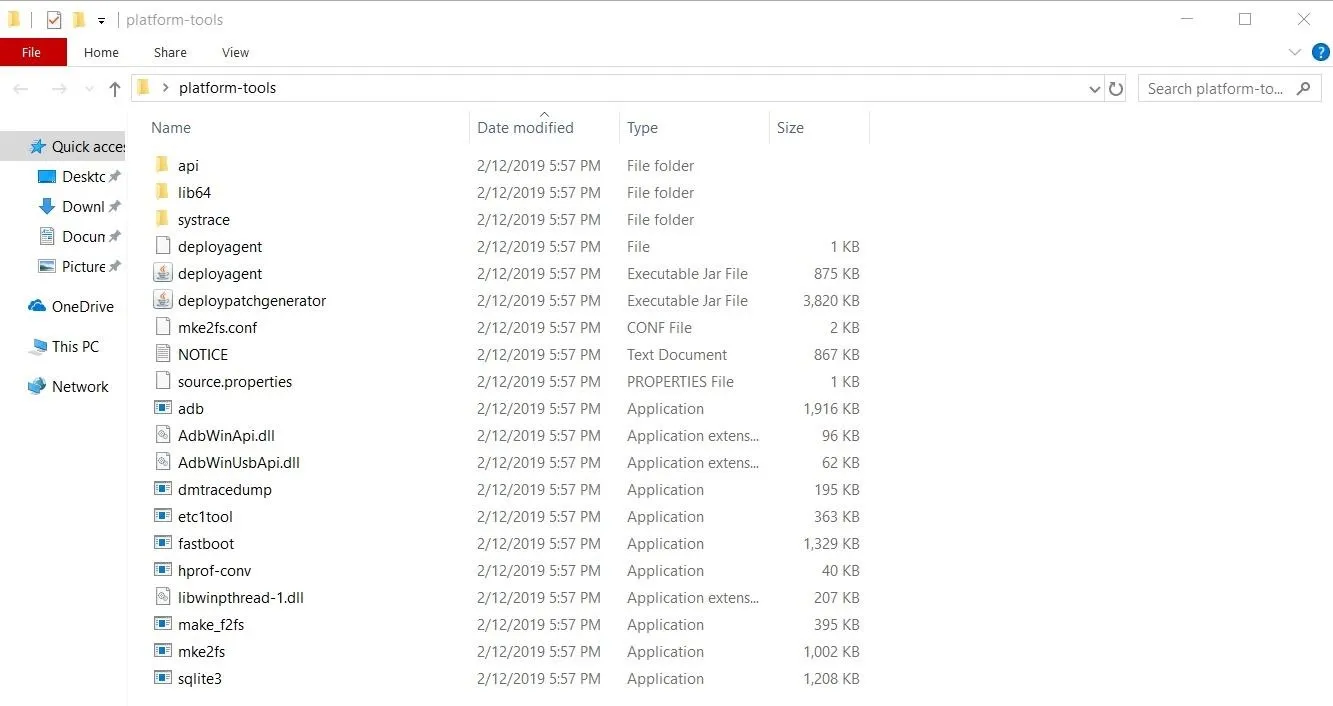
Install ADB & Fastboot on Your Computer
Now that you've got the patched "boot.img" file that you need to gain root access, you'll need to use a quick command to send the file over to your phone on a system level. You'll need to download Google's SDK Platform-Tools standalone package, which will give you everything you need without complicating things.
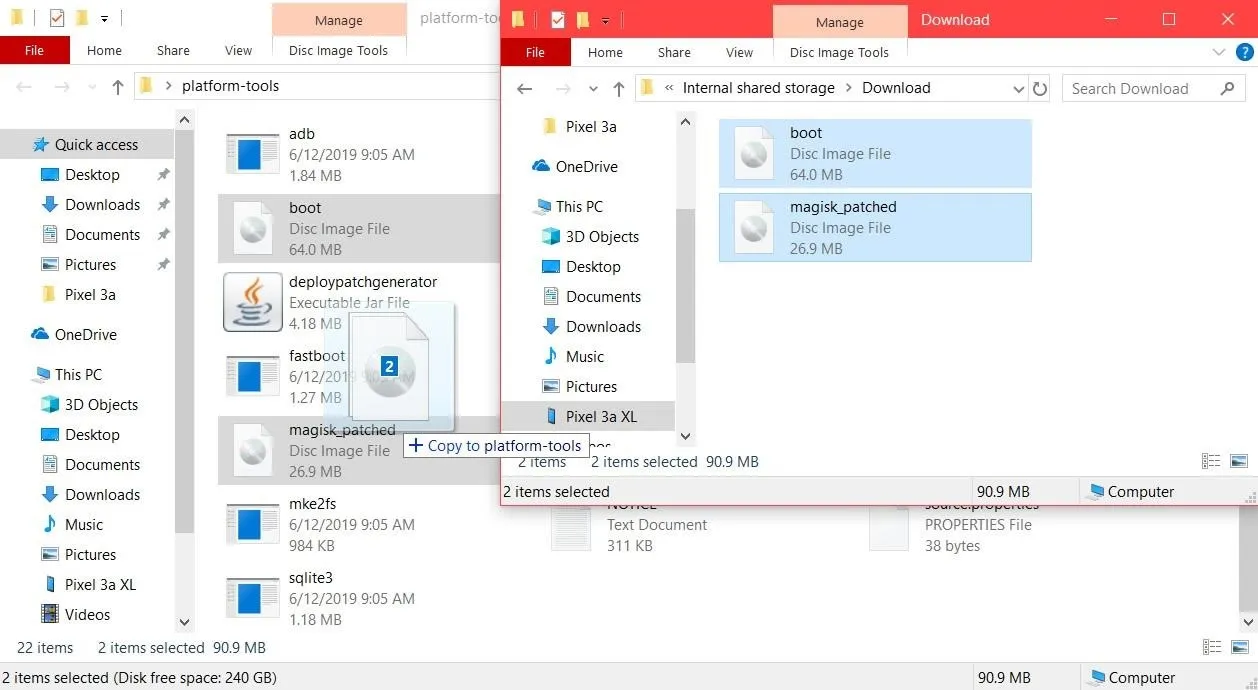
Move the Patched Boot Image to Your Computer
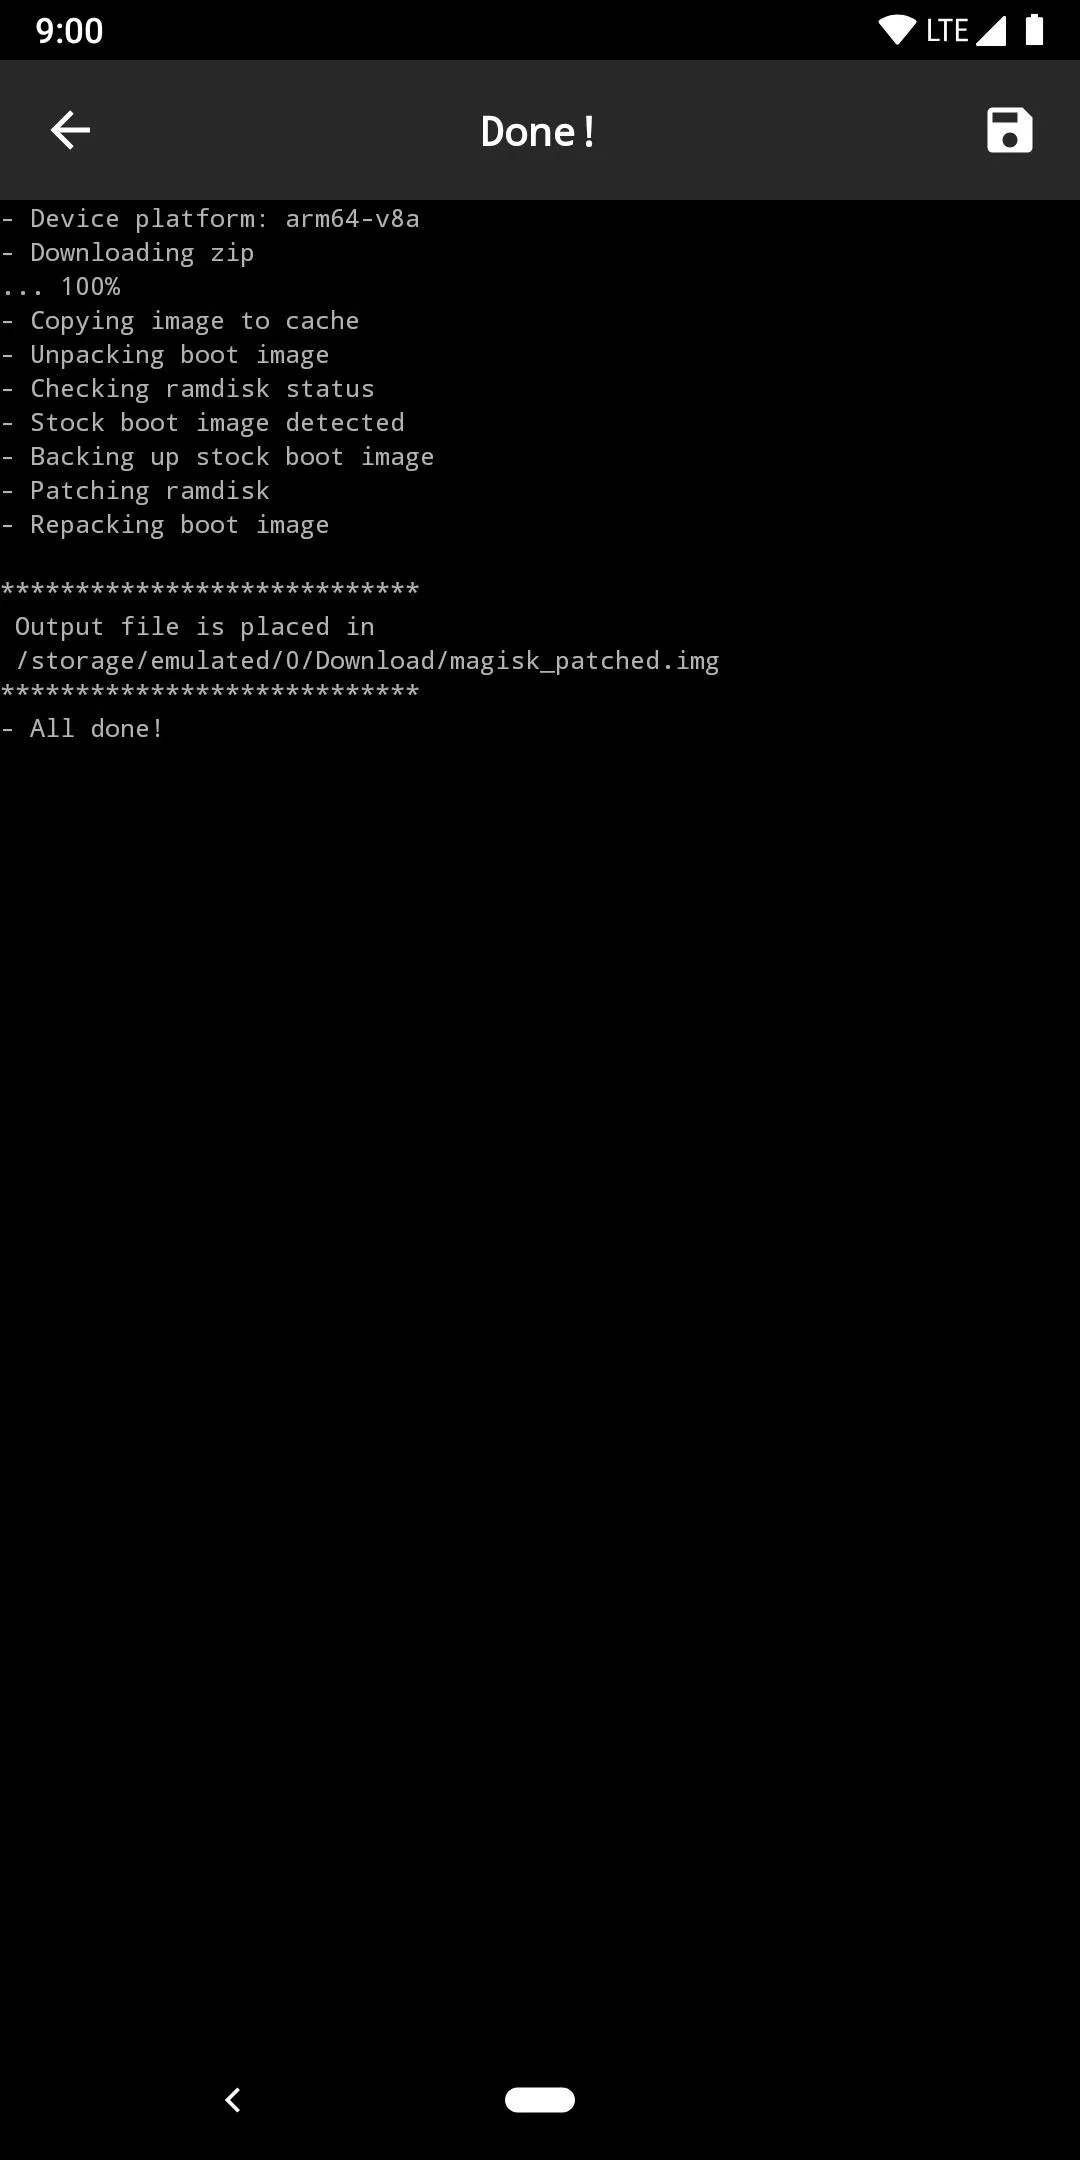
Now you'll need to transfer the patched boot image that you got from Magisk in Step 5 to the platform-tools folder on your computer. It should be named "magisk_patched.img" and will be located within the same "Download" folder that your original file was in. Transfer that file and the original "boot.img" file to your platform-tools folder for safekeeping in case you should need it again.
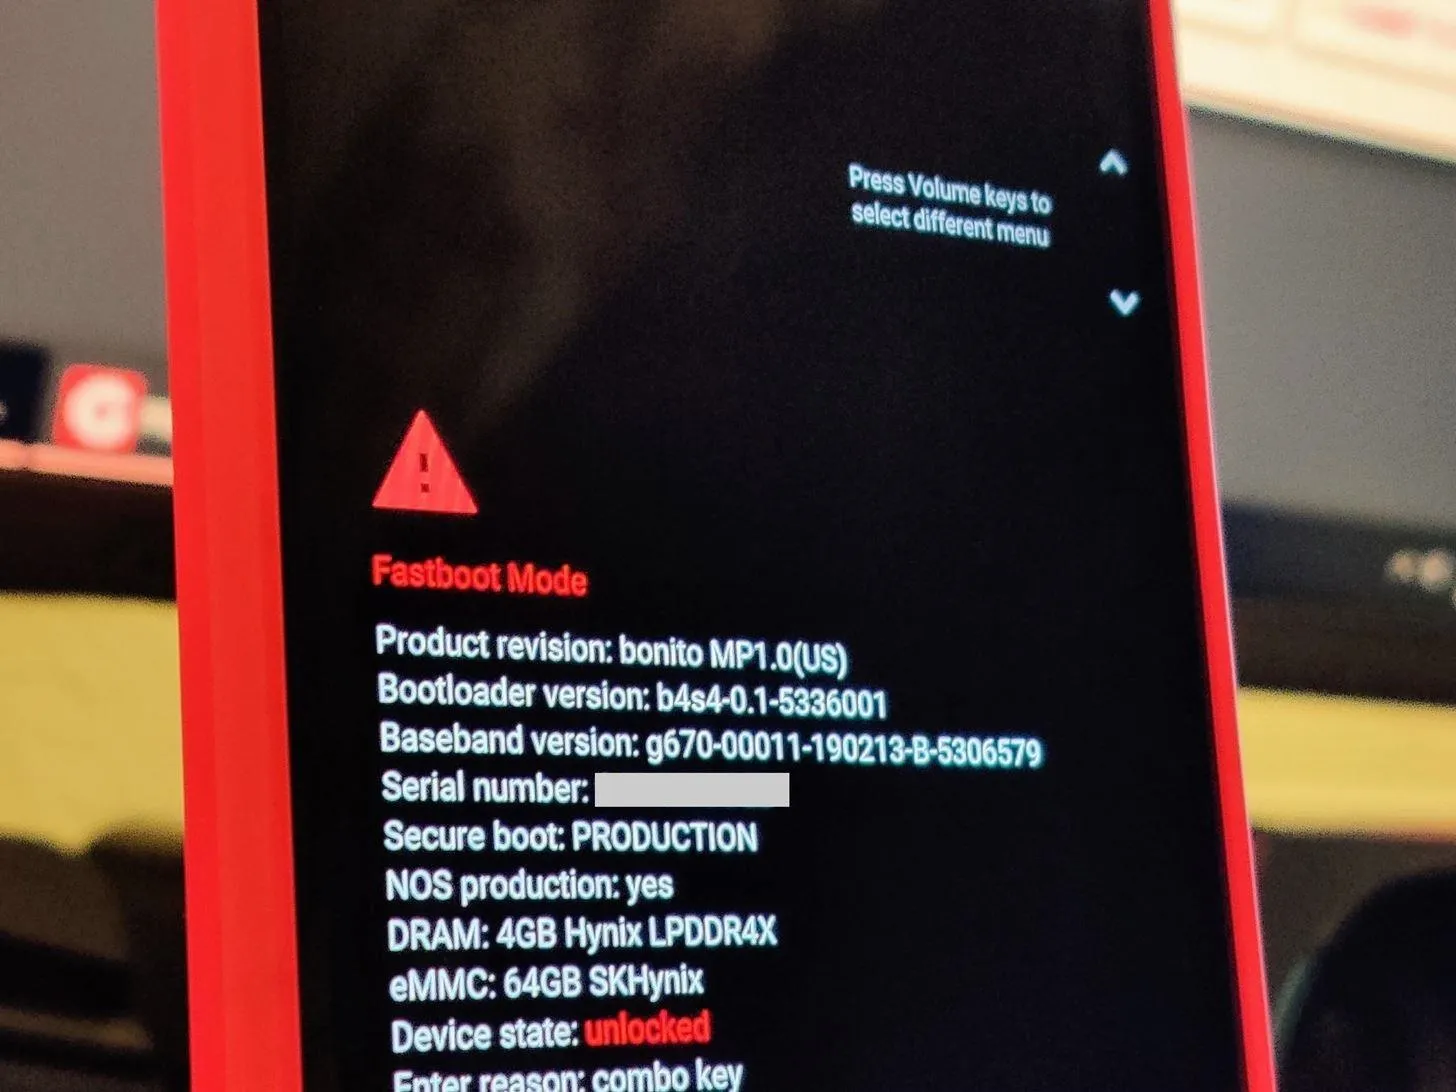
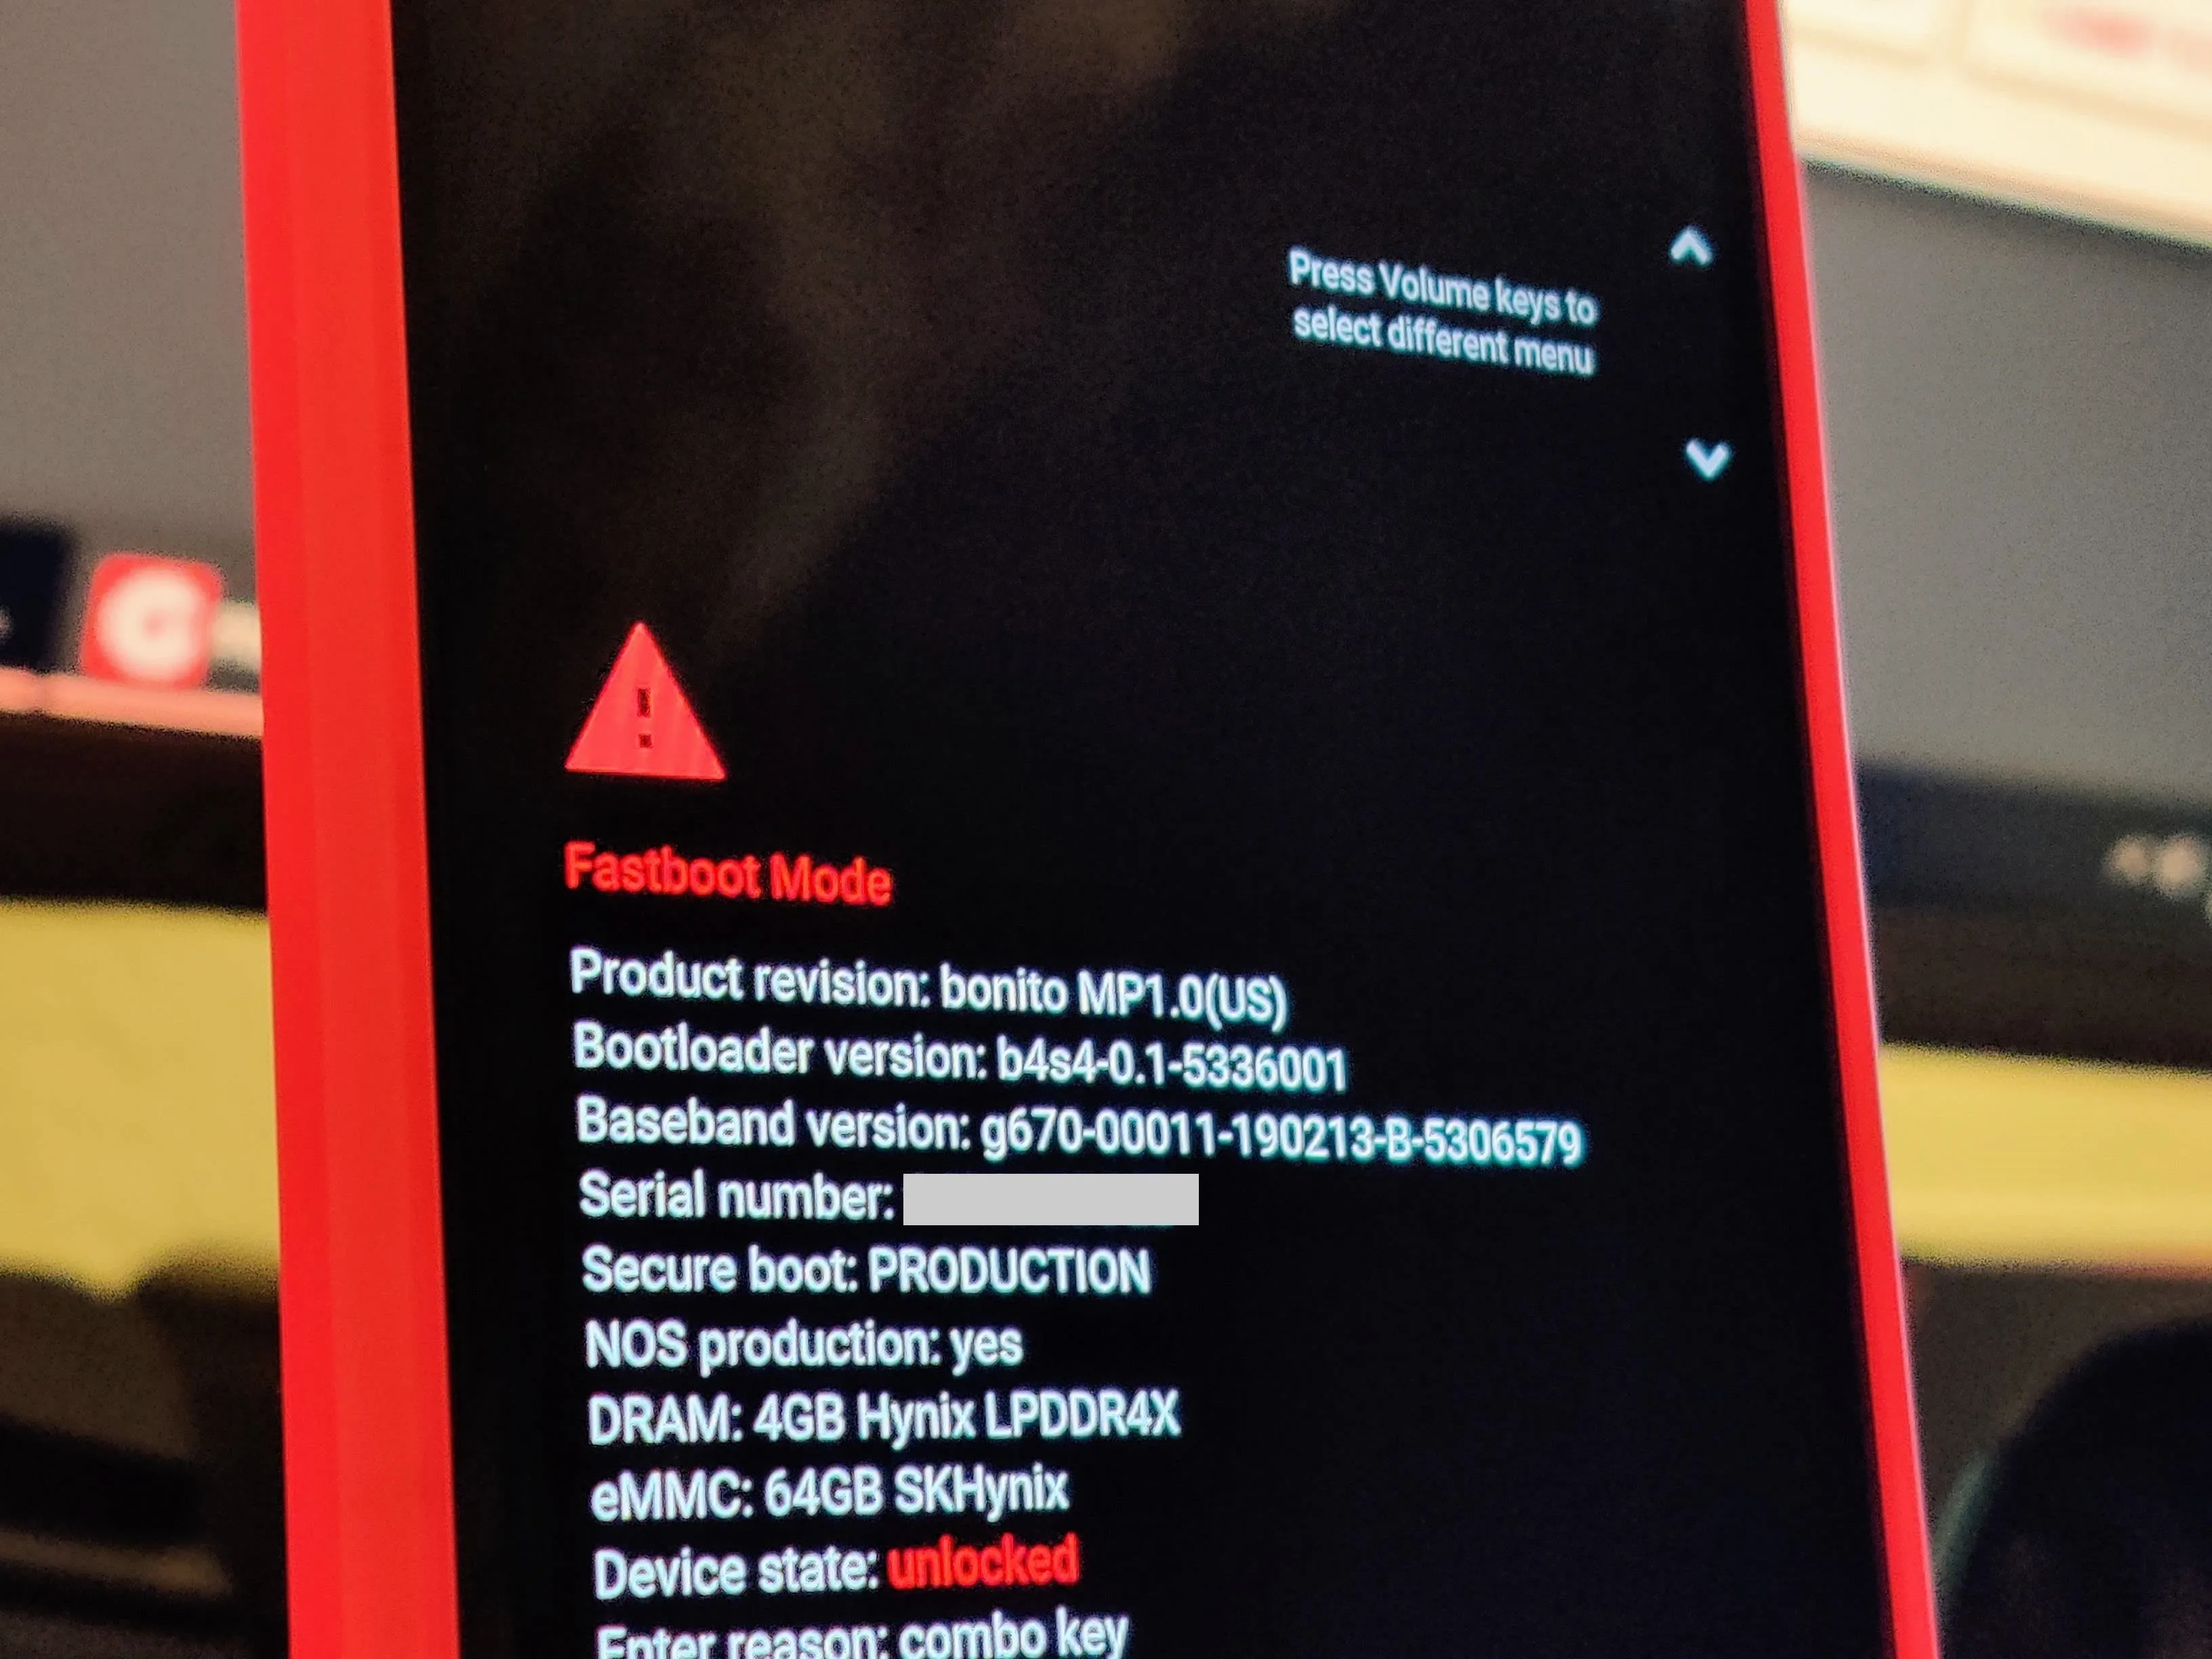
Boot into Fastboot Mode
Now you'll have to put your phone into a state that it can accept the Fastboot command to push over the modified boot image file to your system. Long-press the power button, then tap "Power off" to shut your phone completely down.
When the phone turns off, hold the power button and volume down button at the same time until the Fastboot Mode main menu pops up. Make sure your phone is connected to your computer then leave the phone just like this for the next step.
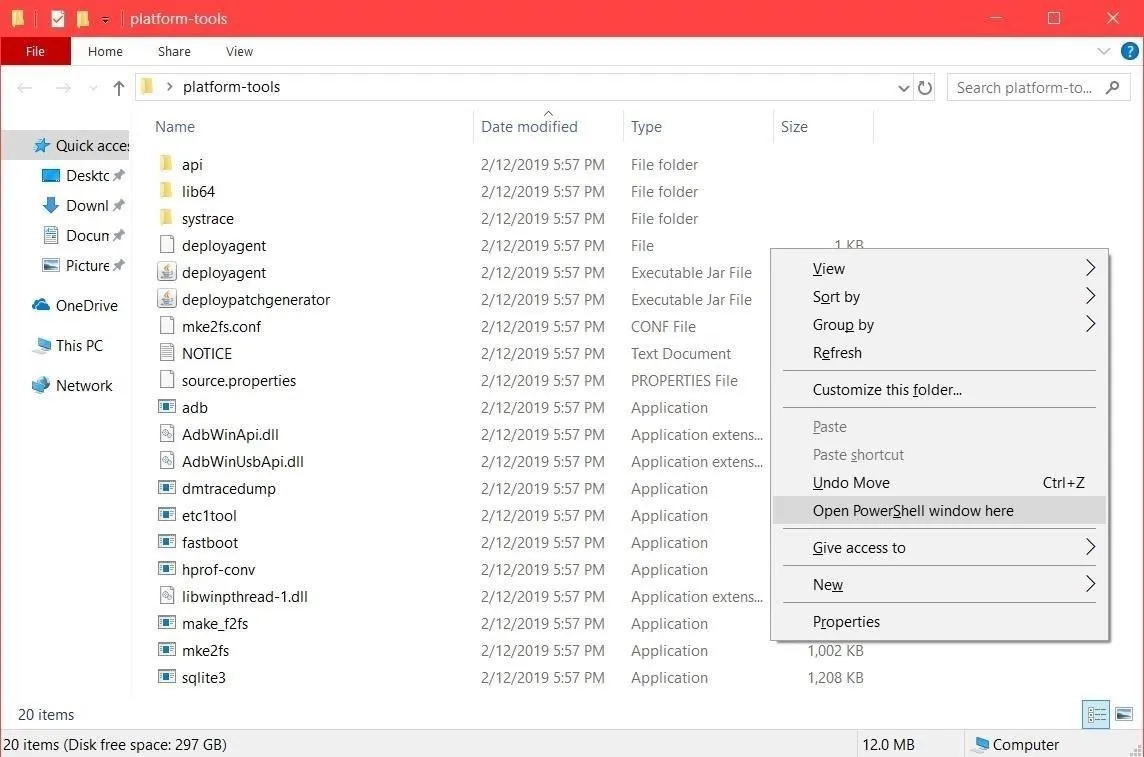
Open a Command Window in Platform-Tools
At this point, your phone should be sitting on the Fastboot Mode main screen. It's almost ready to receive the proper command to send over that patched boot image file to grant your system root access. You'll need to open a command window in the platform-tools folder so that it can send the Fastboot command to the phone. Follow the link below to make sure that's all set before moving on.
Flash the Patched Boot Image
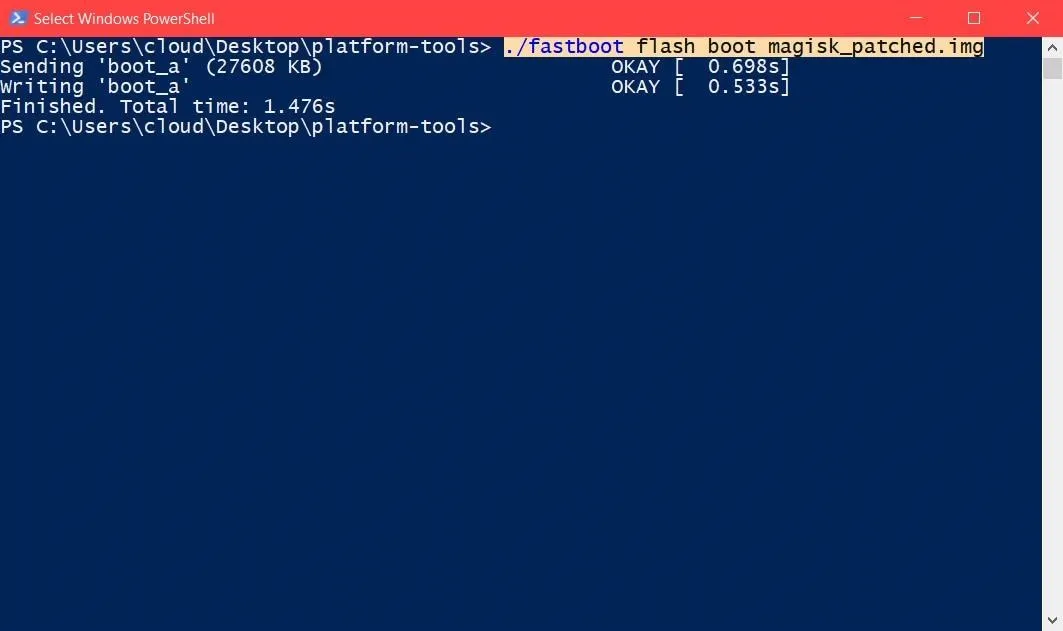
Onto the final and best part — you get to execute the Fastboot command that will give your phone full root access. Type the following command, then press enter.
fastboot flash boot magisk_patched.imgNote: Mac, Linux, and Windows PowerShell users will likely have to add a period and a slash before entering any ADB or Fastboot commands (e.g., ./fastboot flash boot magiskpatched.img).
Verify Root
Once the patched boot image is successfully installed, you'll need to press the volume buttons a few times until you land on the "Start" option in the Fastboot Mode menu. Press the power button to confirm your choice, and it will then reboot your phone back to the lock screen.
After your phone reboots, head back into the Magisk Manager app, then make sure you have both green check marks for "Latest Version" and "Installed Version." You'd also want to tap the arrow next to "Tap to start SafetyNet check" to ensure you pass Google's SafetyNet check.

Cover image and screenshots by Stephen Perkins/Gadget Hacks


Comments
Be the first, drop a comment!